I have a problem where I need to automate publishing a (private) Swift package of a .xcframework built from a private library/SDK.
Background
A quick rant before I begin: I’ve been working as an iOS dev for some time and this sentence from a hacker news post captures my feeling perfectly: "My time as an Apple developer left me with the overwhelming sensation that Apple hates its developers. So much cool looking stuff that mostly worked…"
This shall be the first of many posts where I share my experience of working on the unknown pits in swift, which I hope will help other people along the way to be less frustrated.
Back to the subject.
I was helping my company develop an closed-source, iOS-only SDK/library in Swift that will be shared only to a selected number of clients. I needed to figure out a way to automate building the closed-source swift package into binaries (.xcframework in this case), and distribute them as a private Swift package repository. Since our company uses GitHub, I used GitHub actions to automate this process, and host the binary in GitHub Releases.
Distributing open-source Swift package is easy: publish your package in a source control repository, as described in this official doc from apple.
For closed-source libraries, we can first compile the libraries into binaries, and distribute binaries as swift package with some setup. This means we will need to manage three entities, the repository of source of the private library, the binary of the private library, and another repository that publishes the binary.
Let’s work on a concrete example. You can find the source code and GitHub actions of the automation in these repositories:
Private SDK Setup
Suppose we are developing a closed-source swift package, MyPrivateLib, which has a basic structure:
├── Package.swift
├── Sources
│   └── MyPrivateLib
│       └── MyPrivateLib.swift
└── Tests
    └── MyPrivateLibTests
        └── MyPrivateLibTests.swift
The library functionality is also basic:
func mySecretFunction() -> Int {
    return Int.random(in: 1...100)
}

public func myPublicFunction() -> Int {
    mySecretFunction()
}
Building Binary
From my search on the internet, it’s impossible to create a .xcframework without adding an additional .xcodeproj with a Framework target (not Library target). The easiest way I found to create a .xcodeproj for a swift package is by
creating a new
.xcodeprojwith aFrameworktarget, is usingFile -> New -> Projectin XCodeselecting
Frameworkunder the desired destination tab (iOSfor example)
entering the information about the package, with the package name being
Temp, and then create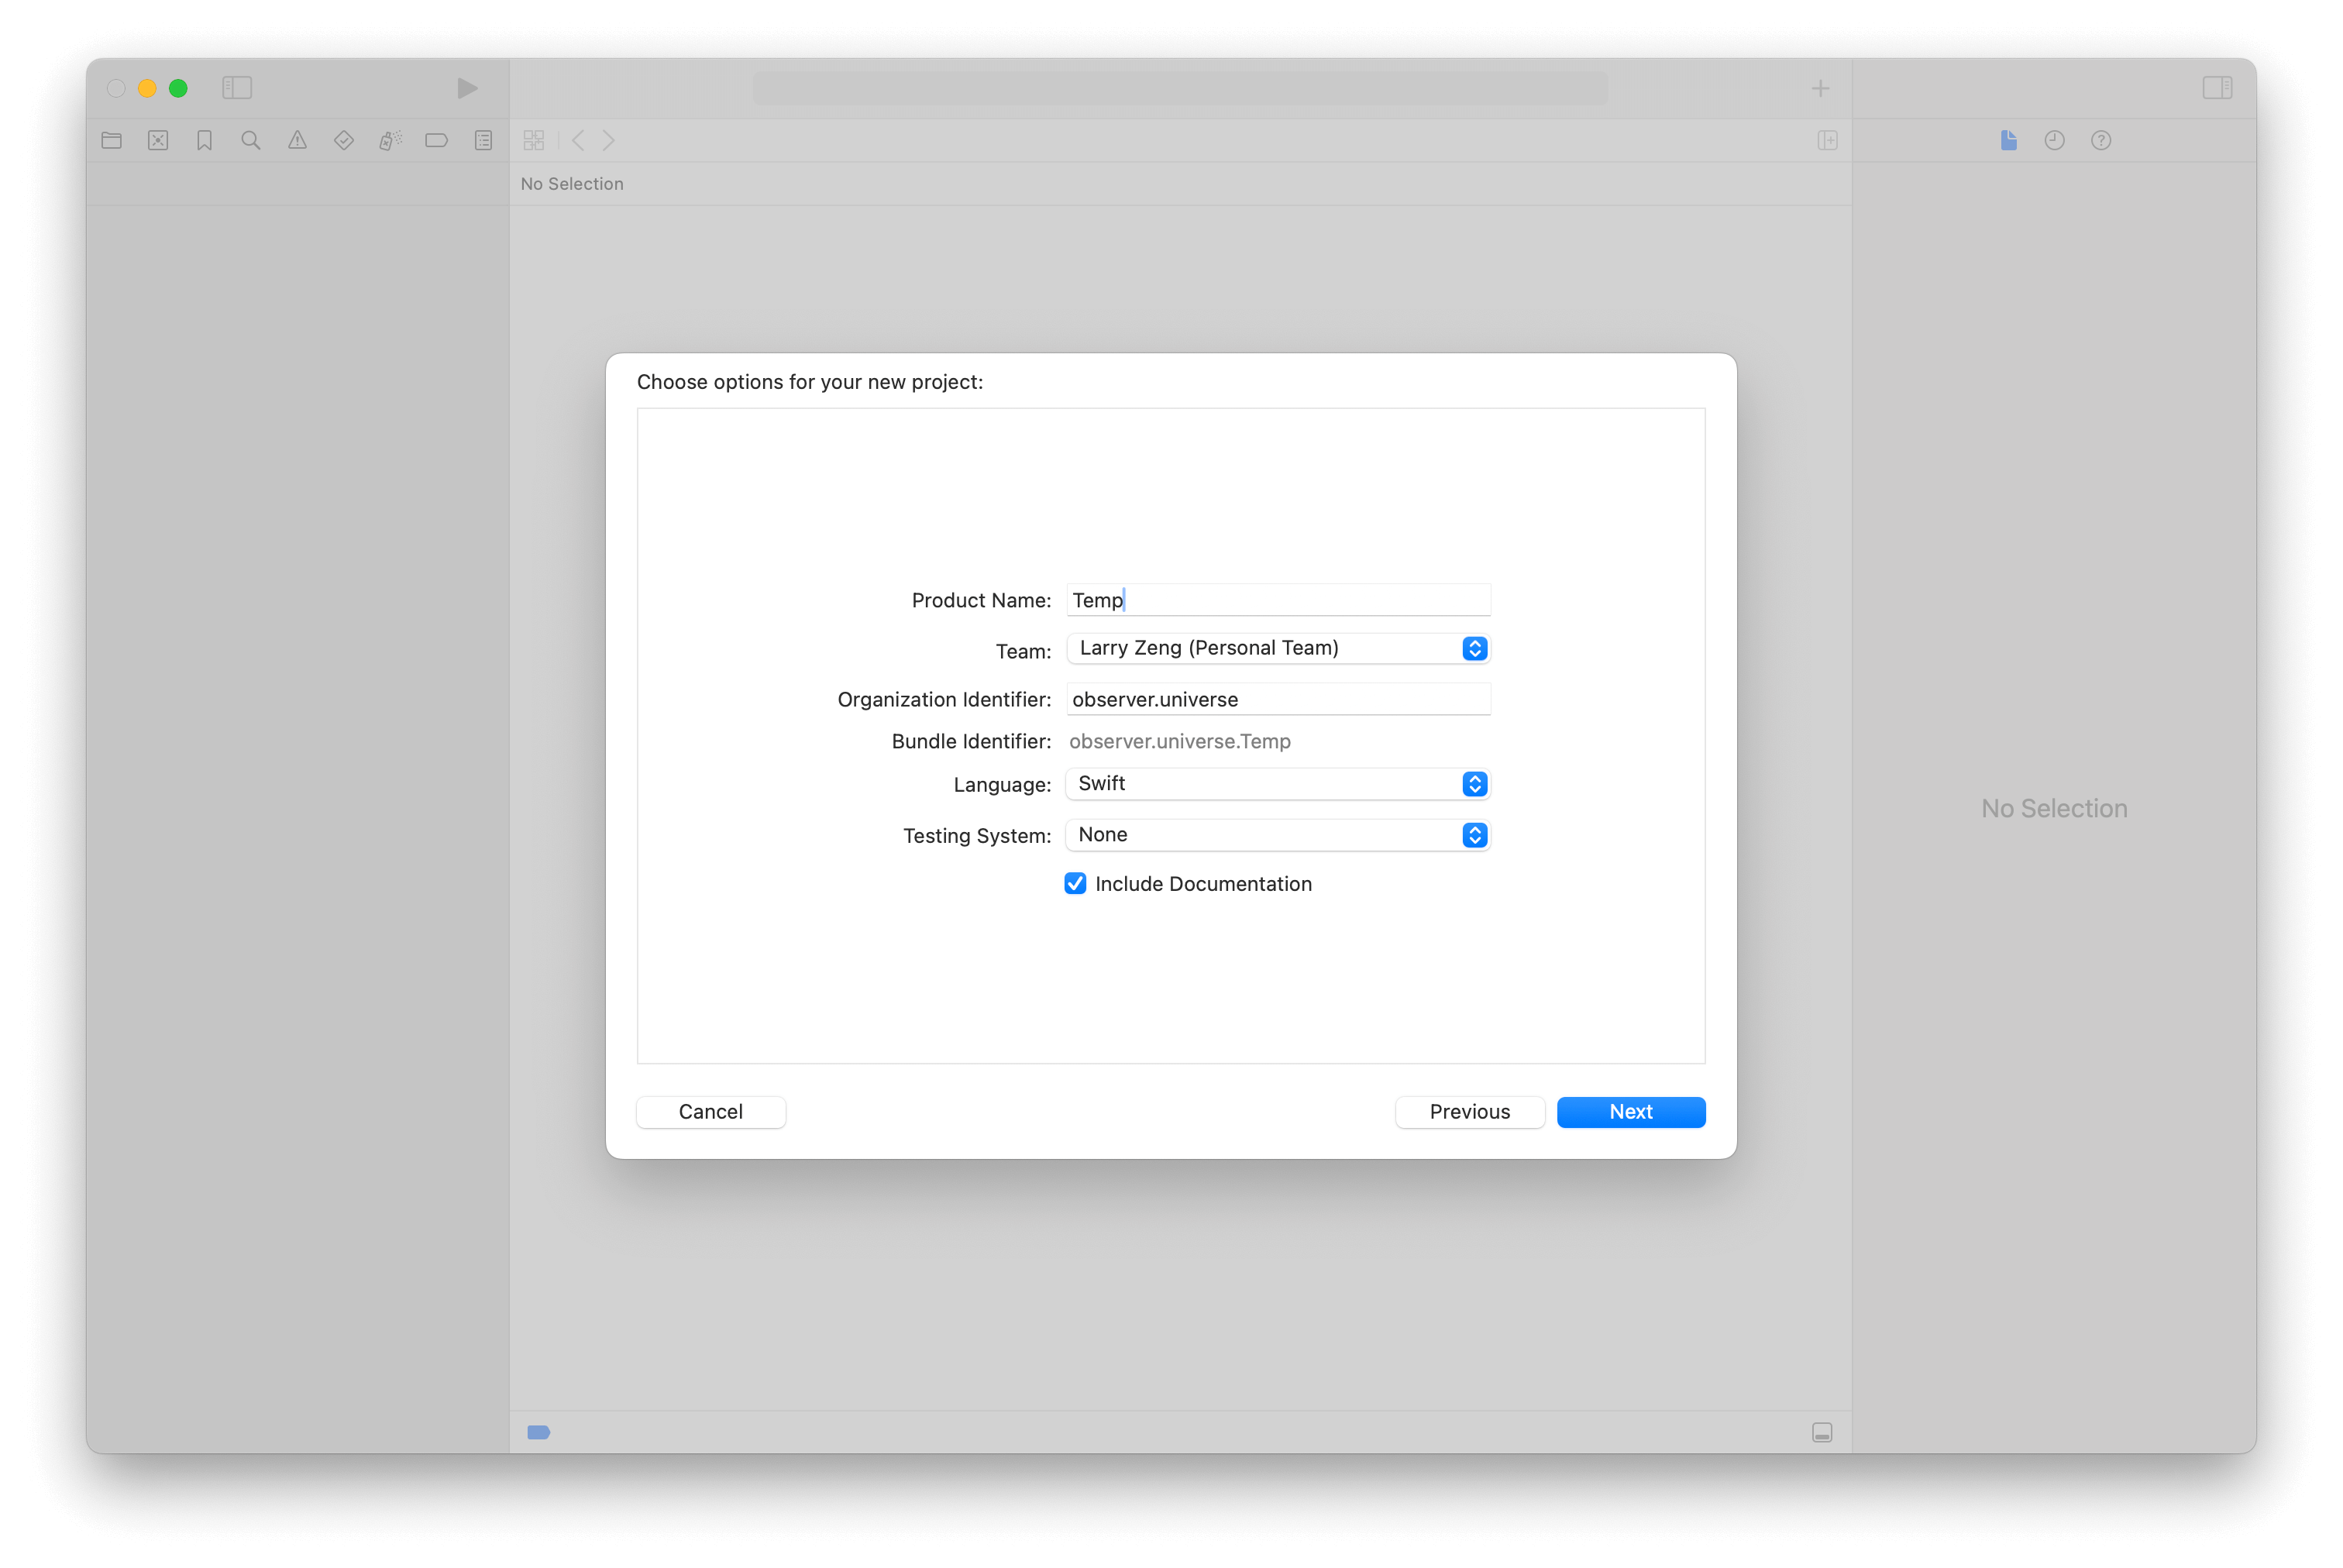
copy the
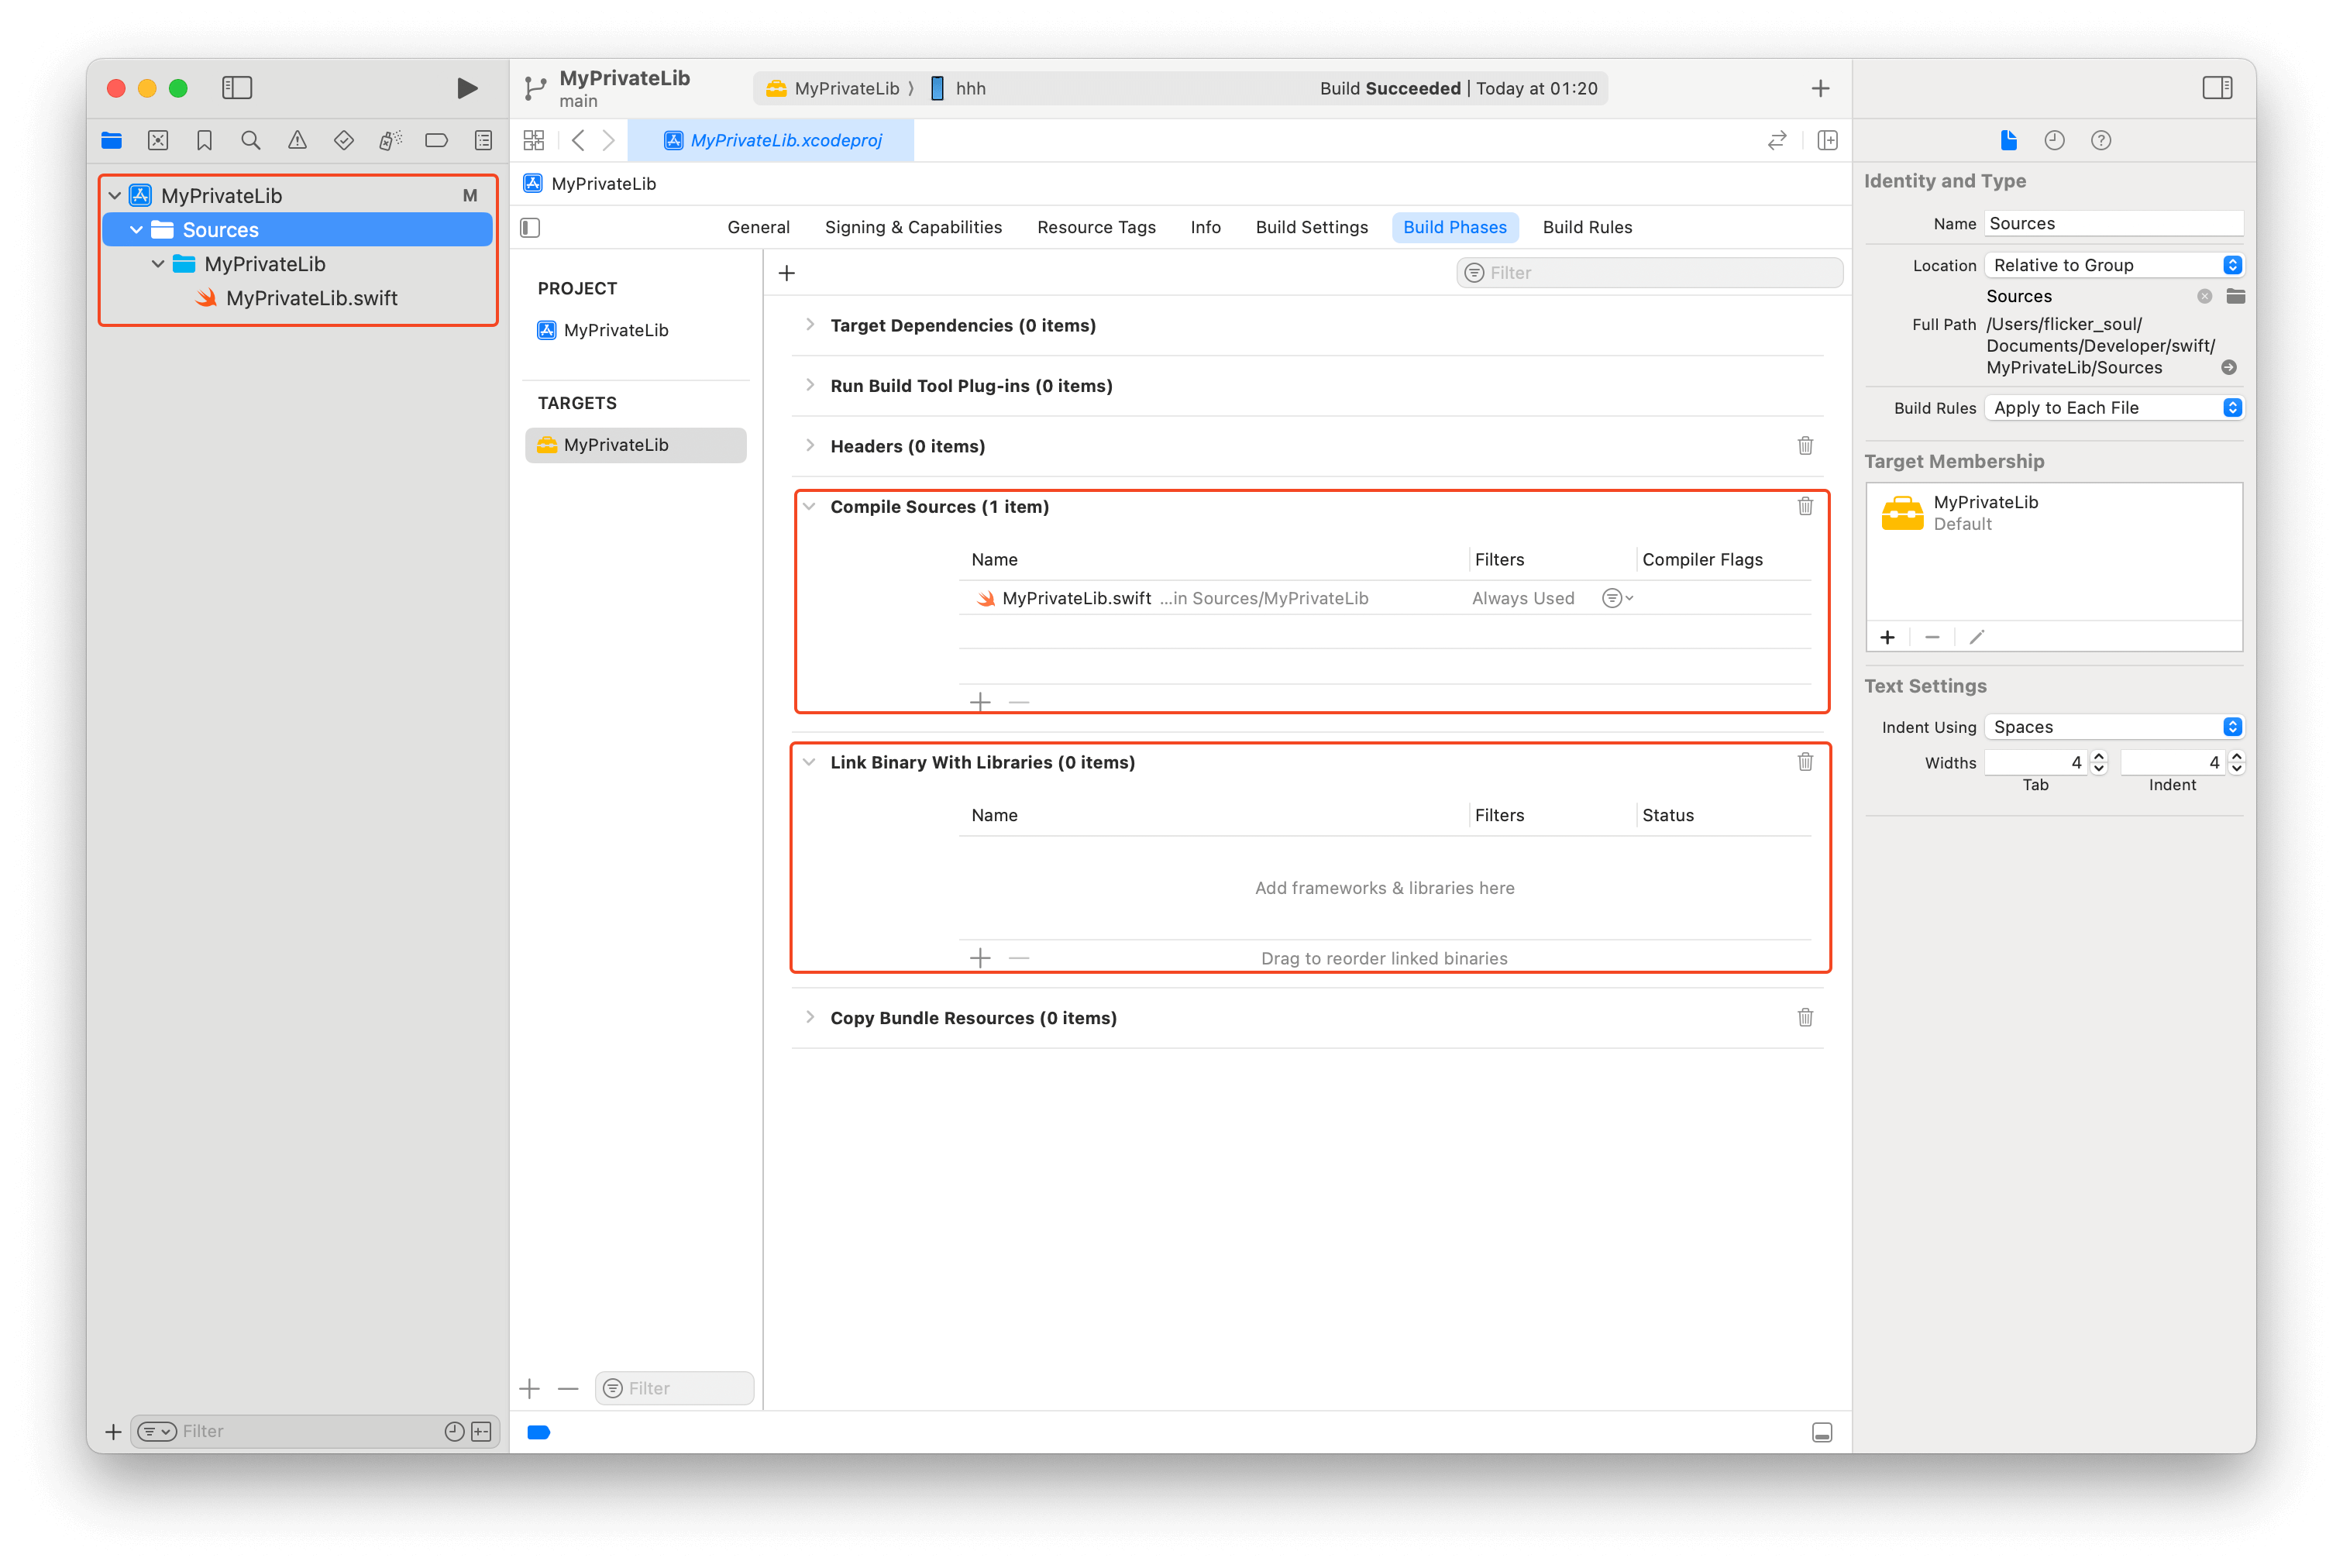
.xcodeprojto the actual package using something likemv Temp/Temp.xcodeproj ./MyPrivateLib/MyPrivateLib.xcodeproj.open the XCode project, replace the metadata (bundle ID, product name, etc.), and add the actual sources, libraries, and even test targets; you may also want to disable "Automatically manage signing"
Before:
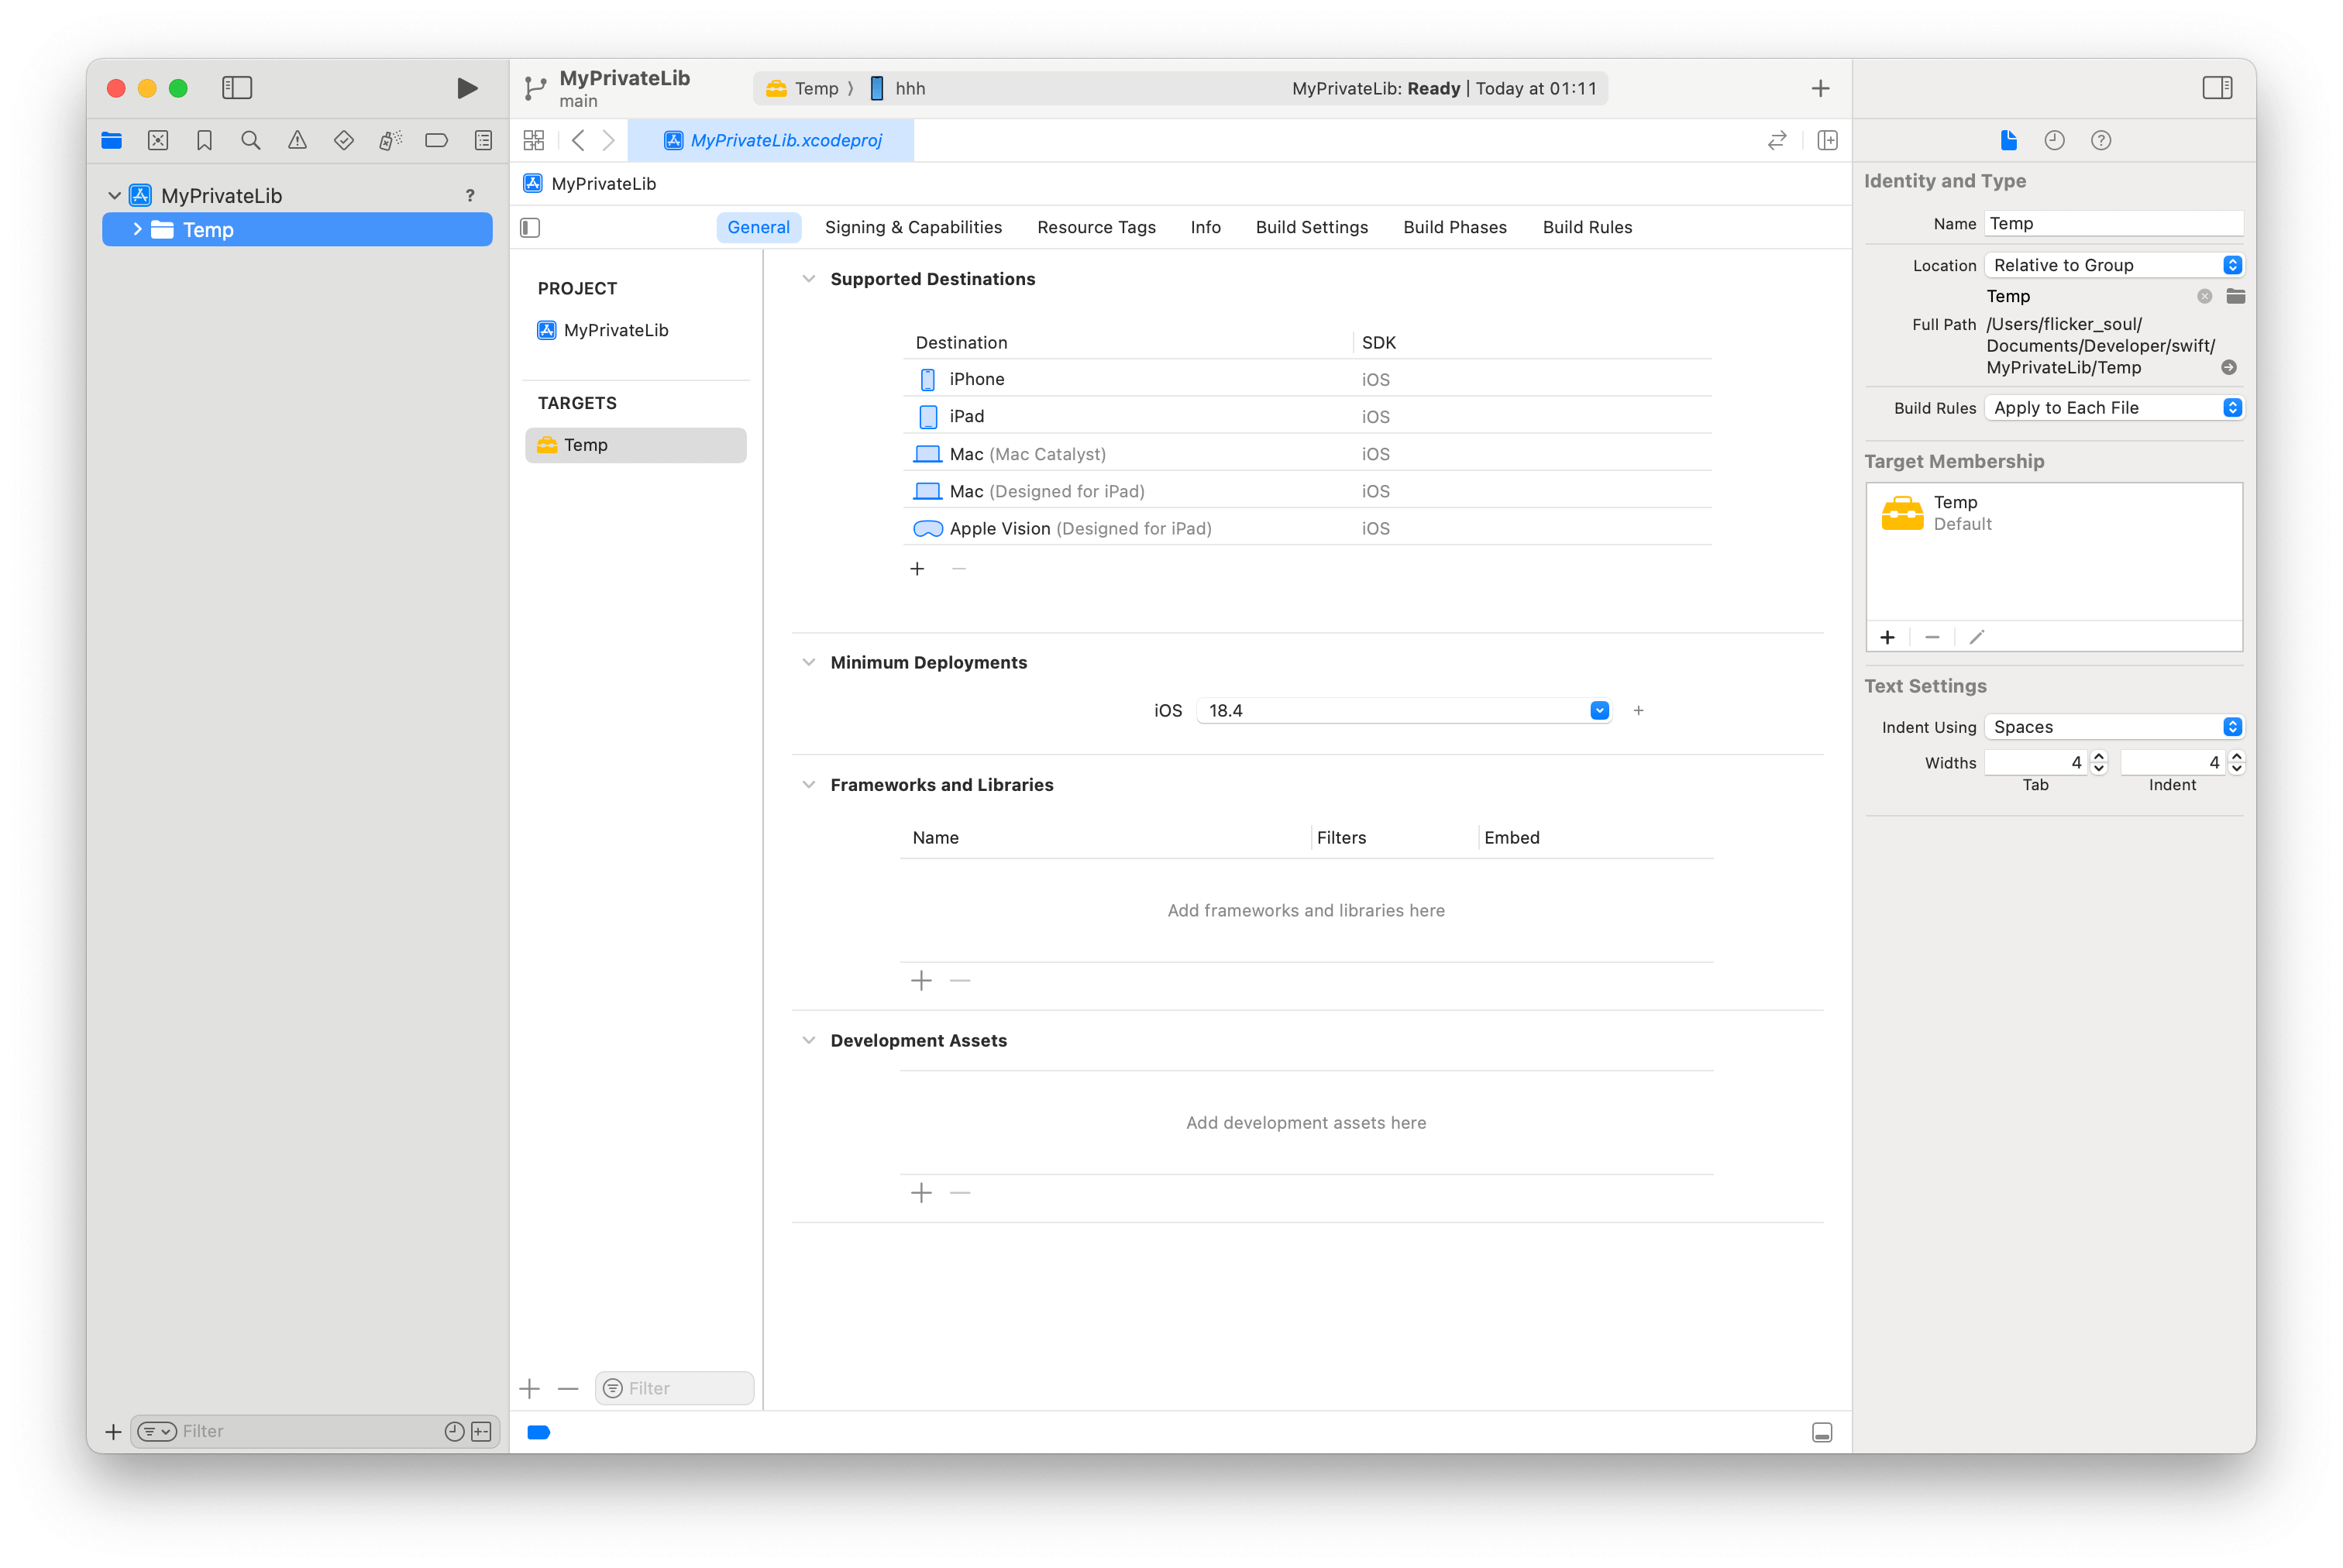
After:
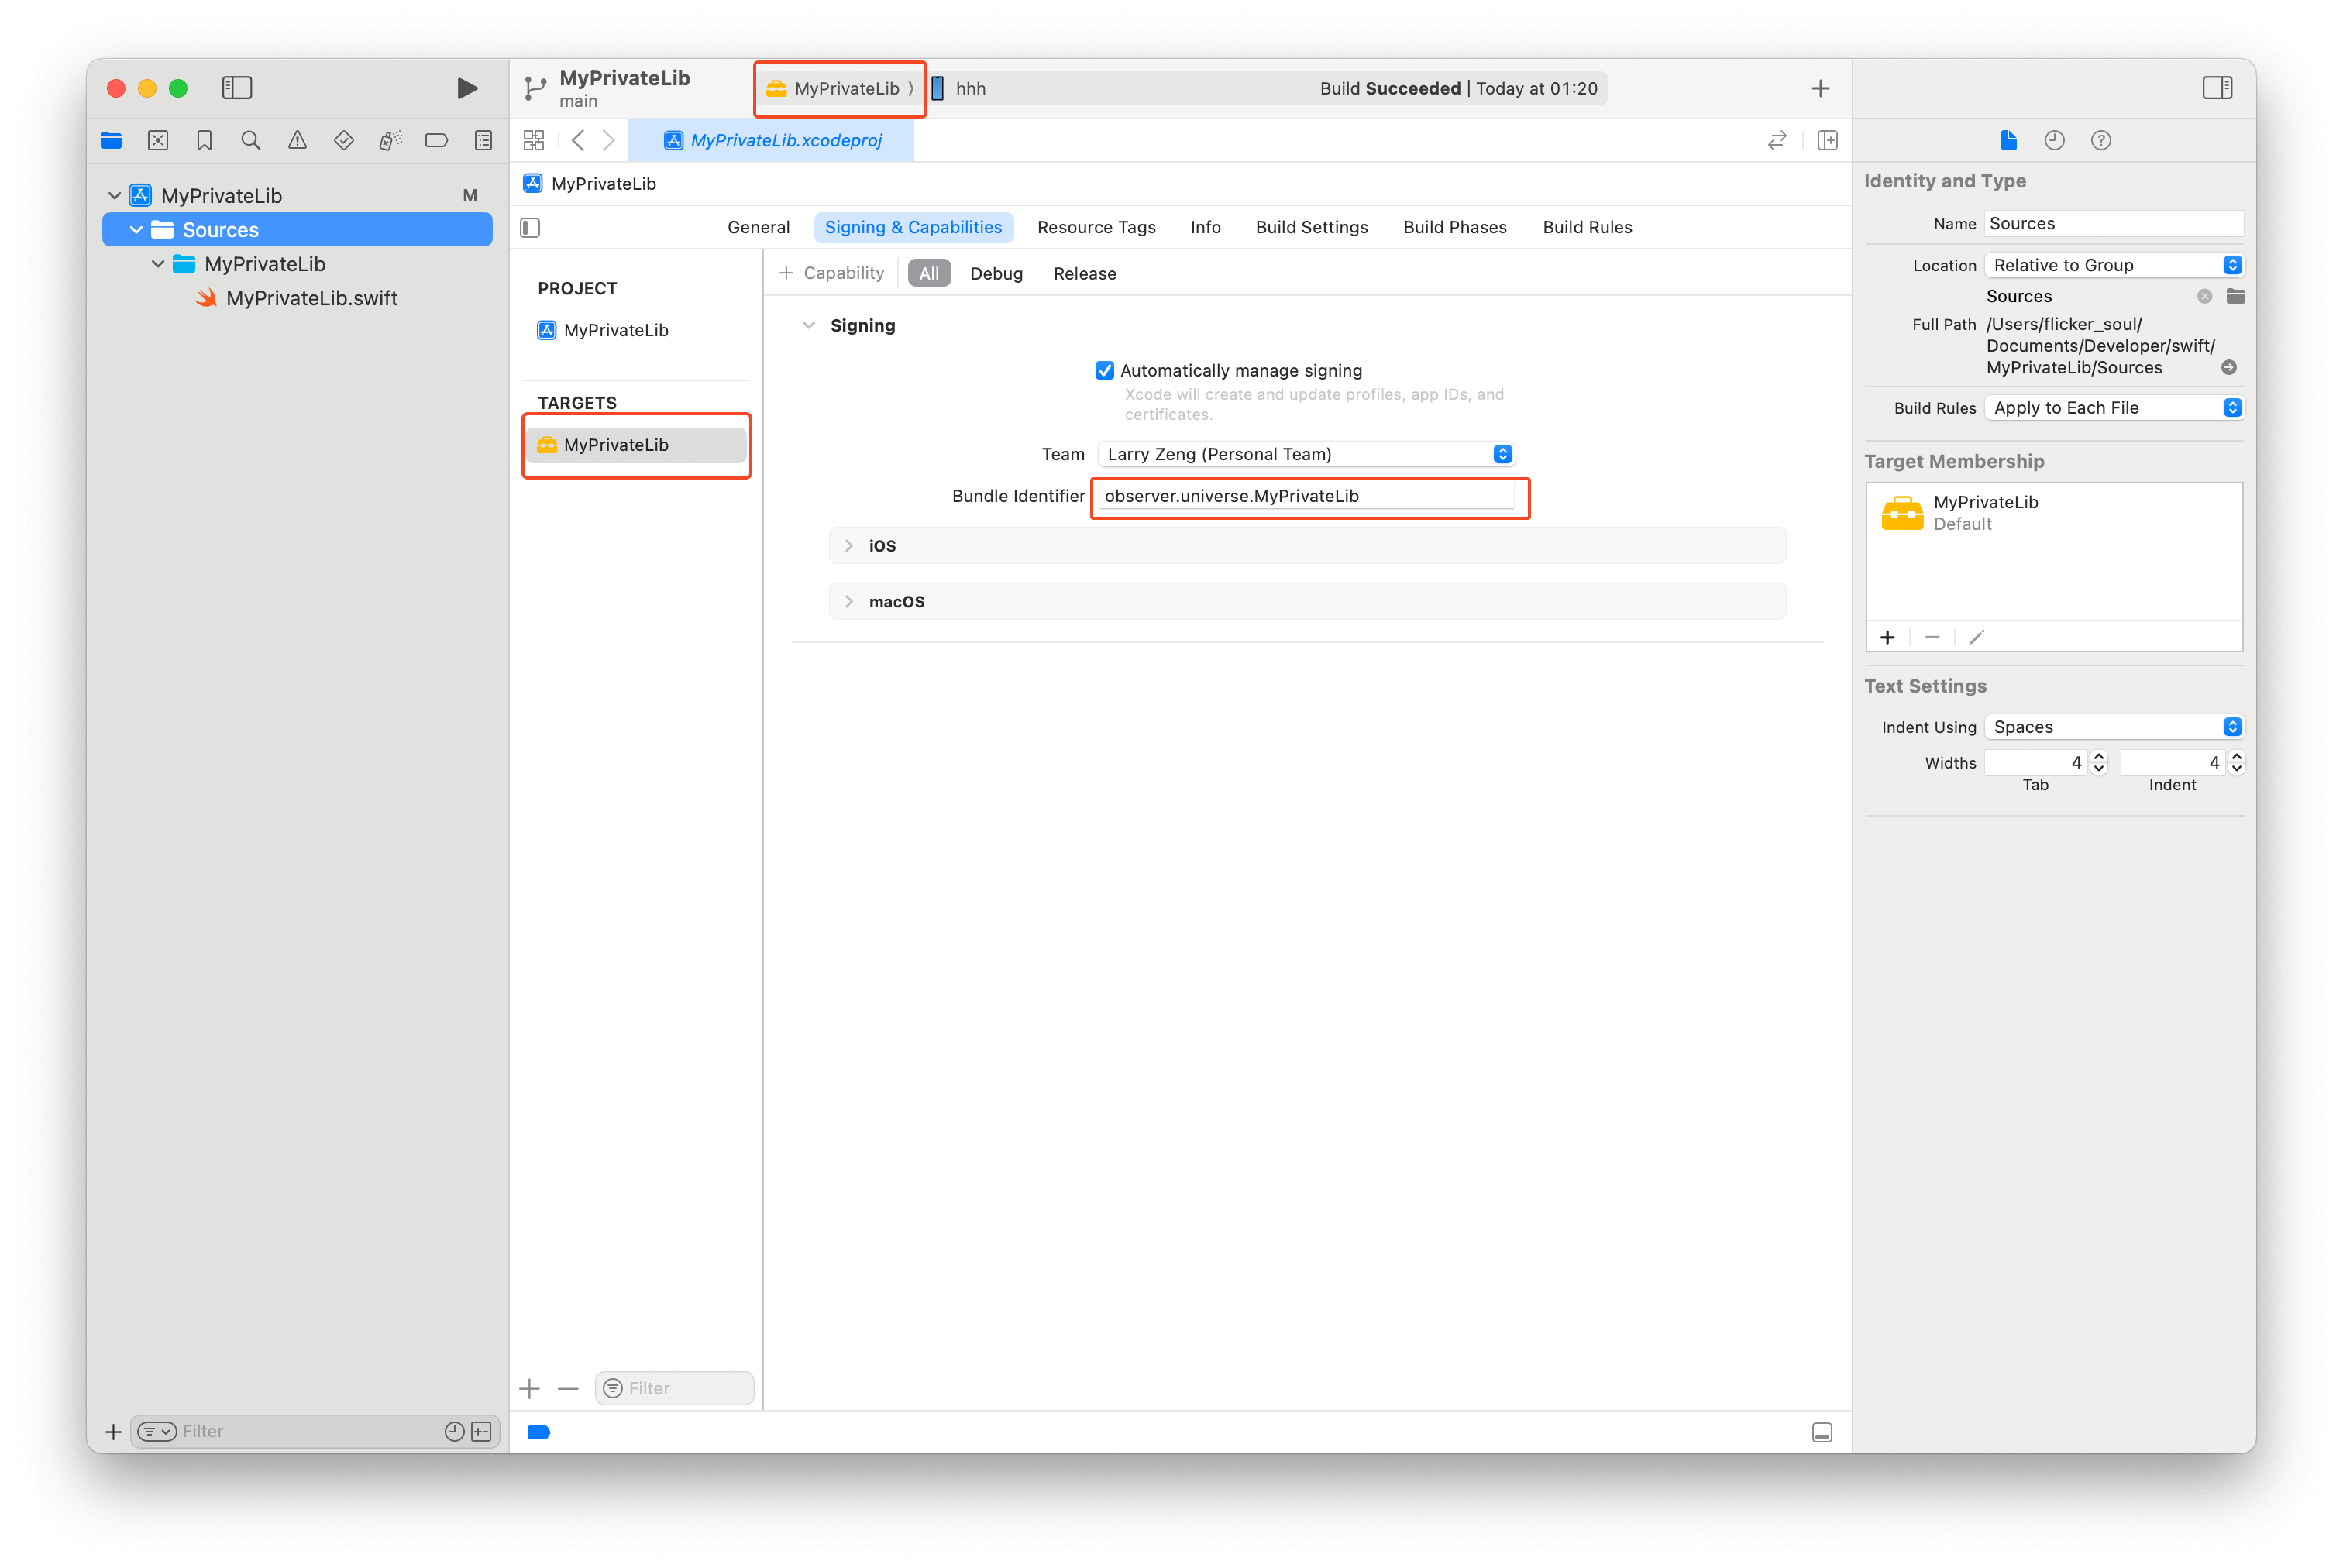
verify the project is setup correctly by using the
xcodebuild -listcommandbash❯ xcodebuild -list Command line invocation: /Applications/Xcode.app/Contents/Developer/usr/bin/xcodebuild -list Information about project "MyPrivateLib": Targets: MyPrivateLib Build Configurations: Debug Release If no build configuration is specified and -scheme is not passed then "Release" is used. Schemes: MyPrivateLib
After creating a .xcodeproj . The project structure looks like this (where xcuserdata folders are omitted):
├── MyPrivateLib.xcodeproj
│   ├── project.pbxproj
│   ├── project.xcworkspace
│   │   ├── contents.xcworkspacedata
│   │   └── xcshareddata
│   │       └── swiftpm
│   │           └── configuration
│   ├── xcshareddata
│   │   └── xcschemes
│   │       └── MyPrivateLib.xcscheme
├── Package.swift
├── scripts
│   ├── build-proj.sh
│   └── set-version.sh
├── Sources
│   └── MyPrivateLib
│       └── MyPrivateLib.swift
└── Tests
    └── MyPrivateLibTests
        └── MyPrivateLibTests.swift
Using .xcodeproj, we can run xcodebuild archive, subsequently xcodebuild -create-xcframework. Below is the script to build and package .xcframework, which can also be found scripts/build-proj.sh in the repository:
#! /bin/bash

set -e

echo "Building XCFramework..."

export PROJECT_PATH="MyPrivateLib.xcodeproj"
export FRAMEWORK_NAME="MyPrivateLib"
export SCHEME_NAME="MyPrivateLib"
export ARCHIVE_PATH="./.build"
export XCFRAMEWORK_OUTPUT="${ARCHIVE_PATH}/Product"
export XCFRAMEWORK_PATH="${XCFRAMEWORK_OUTPUT}/${FRAMEWORK_NAME}.xcframework"

PLATFORMS=("iOS" "iOS Simulator")

rm -rf "${ARCHIVE_PATH}"
mkdir -p "${ARCHIVE_PATH}"

for PLATFORM in "${PLATFORMS[@]}"; do
    # Replace spaces with hyphens for archive filenames
    SAFE_NAME="${PLATFORM// /-}"

    DEST="generic/platform=${PLATFORM}"
    OUT_ARCHIVE="${ARCHIVE_PATH}/${SAFE_NAME}.xcarchive"

    echo "▸ Archiving for ${PLATFORM} → ${OUT_ARCHIVE}"
    xcodebuild archive \
      -project "${PROJECT_PATH}" \
      -scheme "${SCHEME_NAME}" \
      -configuration "${CONFIGURATION}" \
      -destination "${DEST}" \
      -archivePath "${OUT_ARCHIVE}" \
      -skipPackagePluginValidation \
      -skipMacroValidation \
      SKIP_INSTALL=NO \
      BUILD_LIBRARY_FOR_DISTRIBUTION=YES
done

echo "Building XCFramework Creation Args..."
ARGS=()
for PLATFORM in "${PLATFORMS[@]}"; do
  SAFE_NAME="${PLATFORM// /-}"
  ARCHIVE_FILE="${ARCHIVE_PATH}/${SAFE_NAME}.xcarchive"
  ARGS+=(-archive "${ARCHIVE_FILE}" -framework "${FRAMEWORK_NAME}.framework")
done

echo "Creating XCFramework..."
xcodebuild -create-xcframework \
  "${ARGS[@]}" \
  -output "${XCFRAMEWORK_PATH}"

if [ "$GITHUB_ACTIONS" = "true" ]; then
  # Export the variable for later steps in the workflow
  echo "Export output path to GitHub"
  echo "XCFRAMEWORK_OUTPUT=$(realpath "${XCFRAMEWORK_OUTPUT}")" >> "$GITHUB_ENV"
  echo "XCFRAMEWORK_PATH=$(realpath "${XCFRAMEWORK_PATH}")" >> "$GITHUB_ENV"
fi

echo "XCFramework created successfully at ${XCFRAMEWORK_PATH}"
Release Swift Package Setup
We create another swift package MyPrivateLibRelease that will be handed out to clients and installed in their application. The structure is as the following.
├── Package.swift
└── Sources
    └── MyPrivateLibRelease
        └── MyPrivateLibRelease.swift
The structure feels trivial, because the Package.swift is actually doing the magic, especially in the highlighted area. You can find more in the official doc.
// swift-tools-version: 6.1
// The swift-tools-version declares the minimum version of Swift required to build this package.

import PackageDescription

let package = Package(
    name: "MyPrivateLibRelease",
    products: [
        // Products define the executables and libraries a package produces, making them visible to other packages.
        .library(
            name: "MyPrivateLibRelease",
            targets: ["MyPrivateLibRelease", "MyPrivateLib"]
        ),
    ],
    targets: [
        // Targets are the basic building blocks of a package, defining a module or a test suite.
        // Targets can depend on other targets in this package and products from dependencies.
        .target(
            name: "MyPrivateLibRelease"
        ),
        .binaryTarget(
            name: "MyPrivateLib",
            url: "",
            checksum: ""
        )
    ]
)
Whenever a new release of our closed-source library is created, we want to update the url and checksum to match the corresponding new release.
GitHub Actions Automating Release Uploading
To automate the release process, we create a GitHub Actions workflow in the MyPrivateLib repository which can be found here.
The flow essentially does the following steps:
- Build project into
.xcframeworkbinary - Sign the binary (If you’re not familar with signing, you can check out this post and the official document)
- Calculate the checksum (to be used in the
Package.swift) - Calculate the version of this release (usually based on the git tag)
- Draft a new release in the
MyPrivateLibReleaserepository, with the same version - Upload the binary to the release
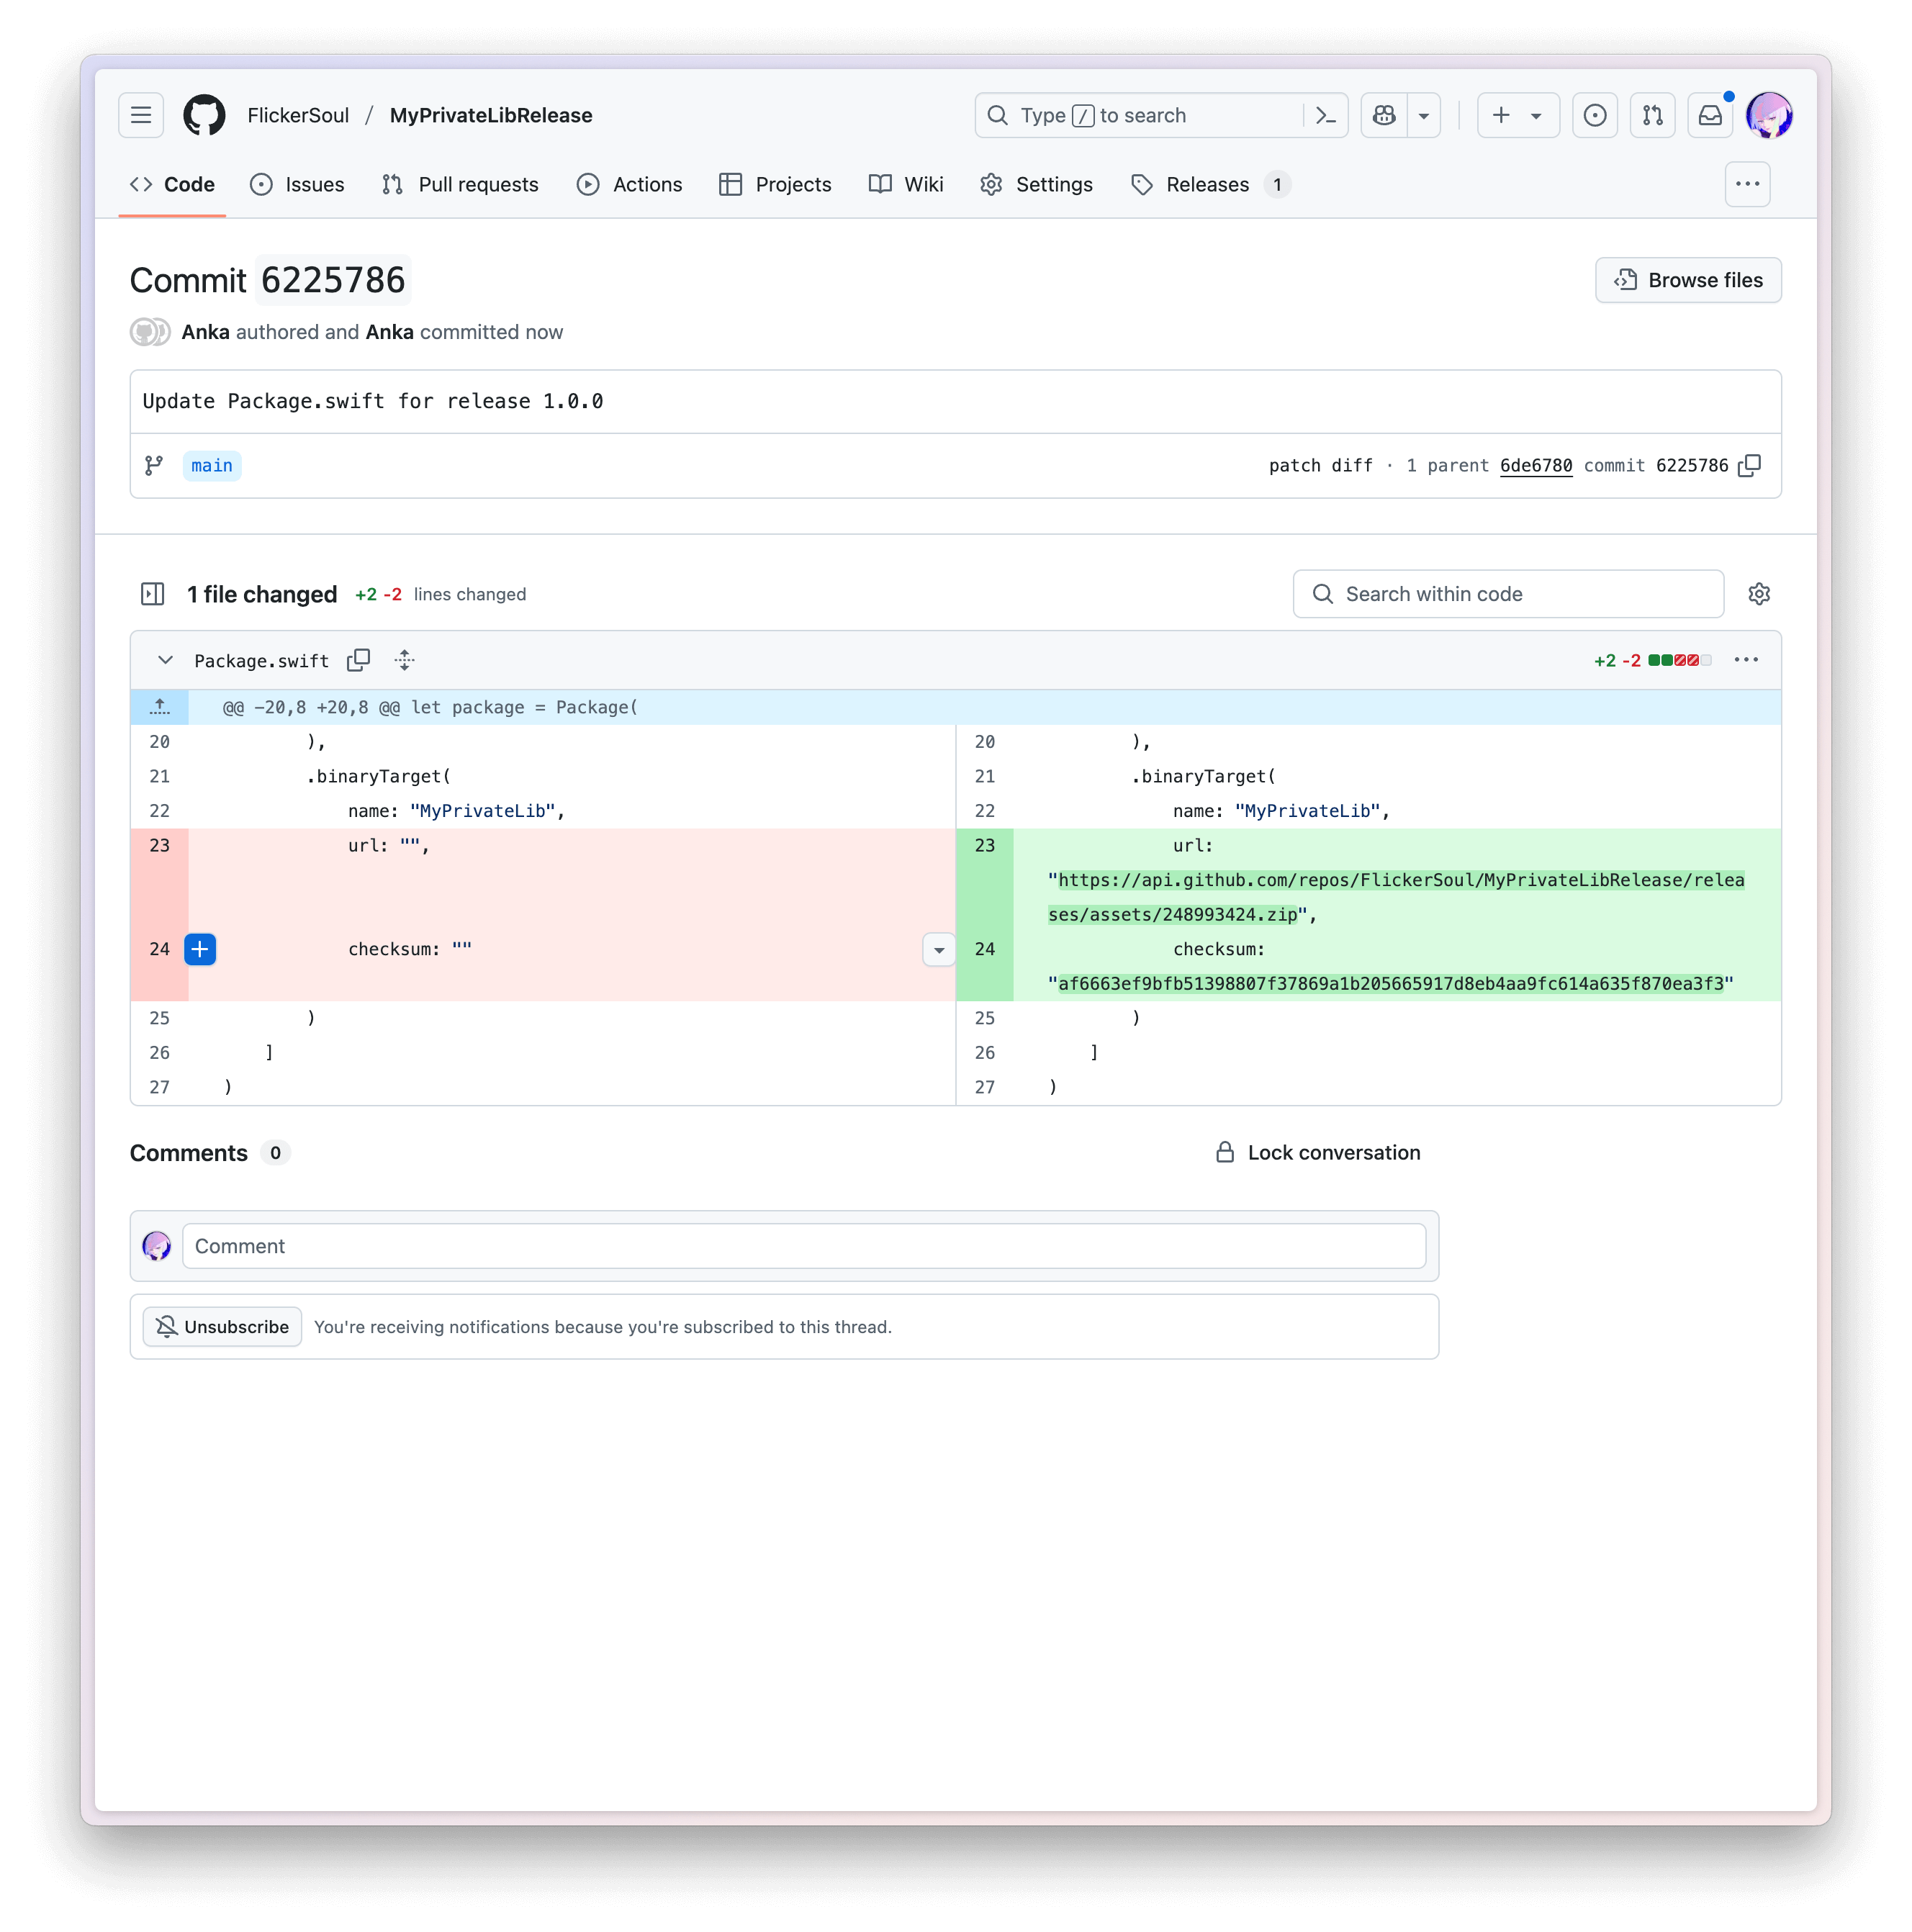
- Modify
urlto point to the uploaded binary andchecksumto be the one calculated in the previous step, in thePackage.swiftinMyPrivateLibRelease
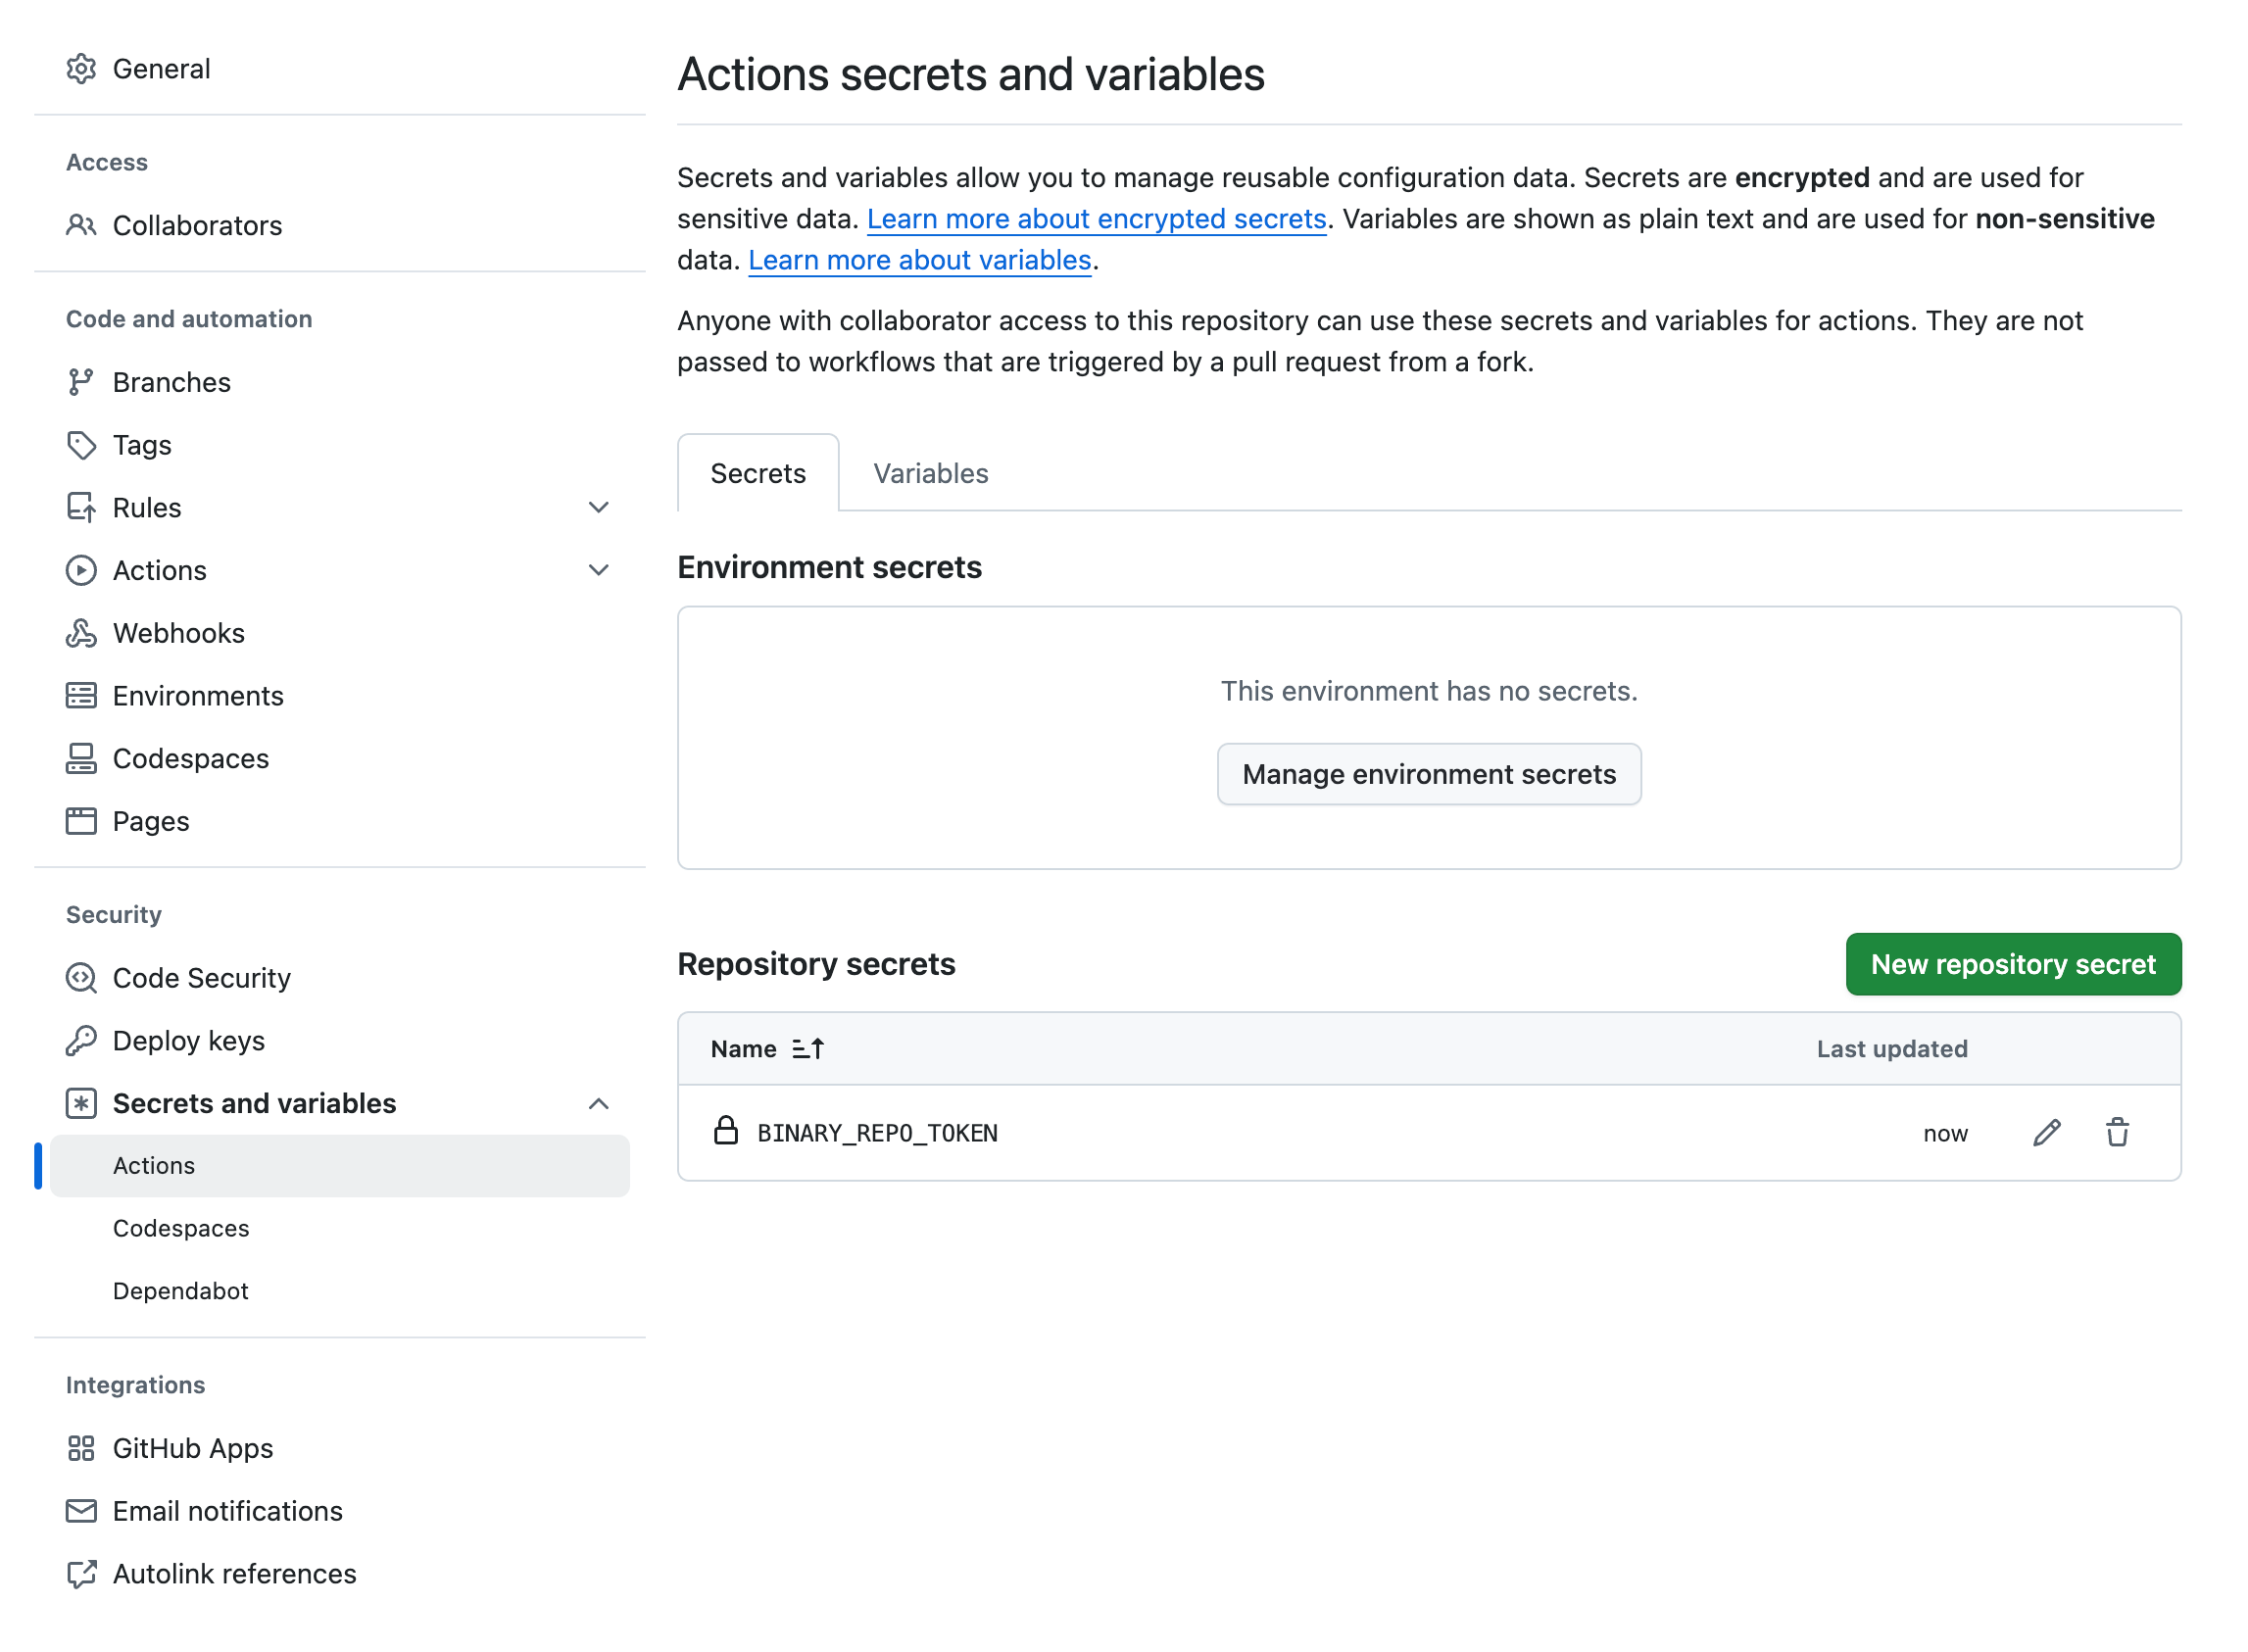
Note that, since we are uploading the binary from MyPrivateLib to MyPrivateLibRelease, a GitHub personal access token (PAT) is needed, and is referred as secrets.BINARY_REPO_TOKEN in the workflow. The PAT token needs Read/Write permission to Content and Workflow to create a release, as per GitHub document.
Try Creating A Release
With this setup, you can then publish your closed-source library through a Swift package containing the corresponding binary. Whenever a release is created in the source library (MyPrivateLib in this example), a new release will be automatically created in the binary Swift package.
That is, say when a 1.0.0 release is created in MyPrivateLib,
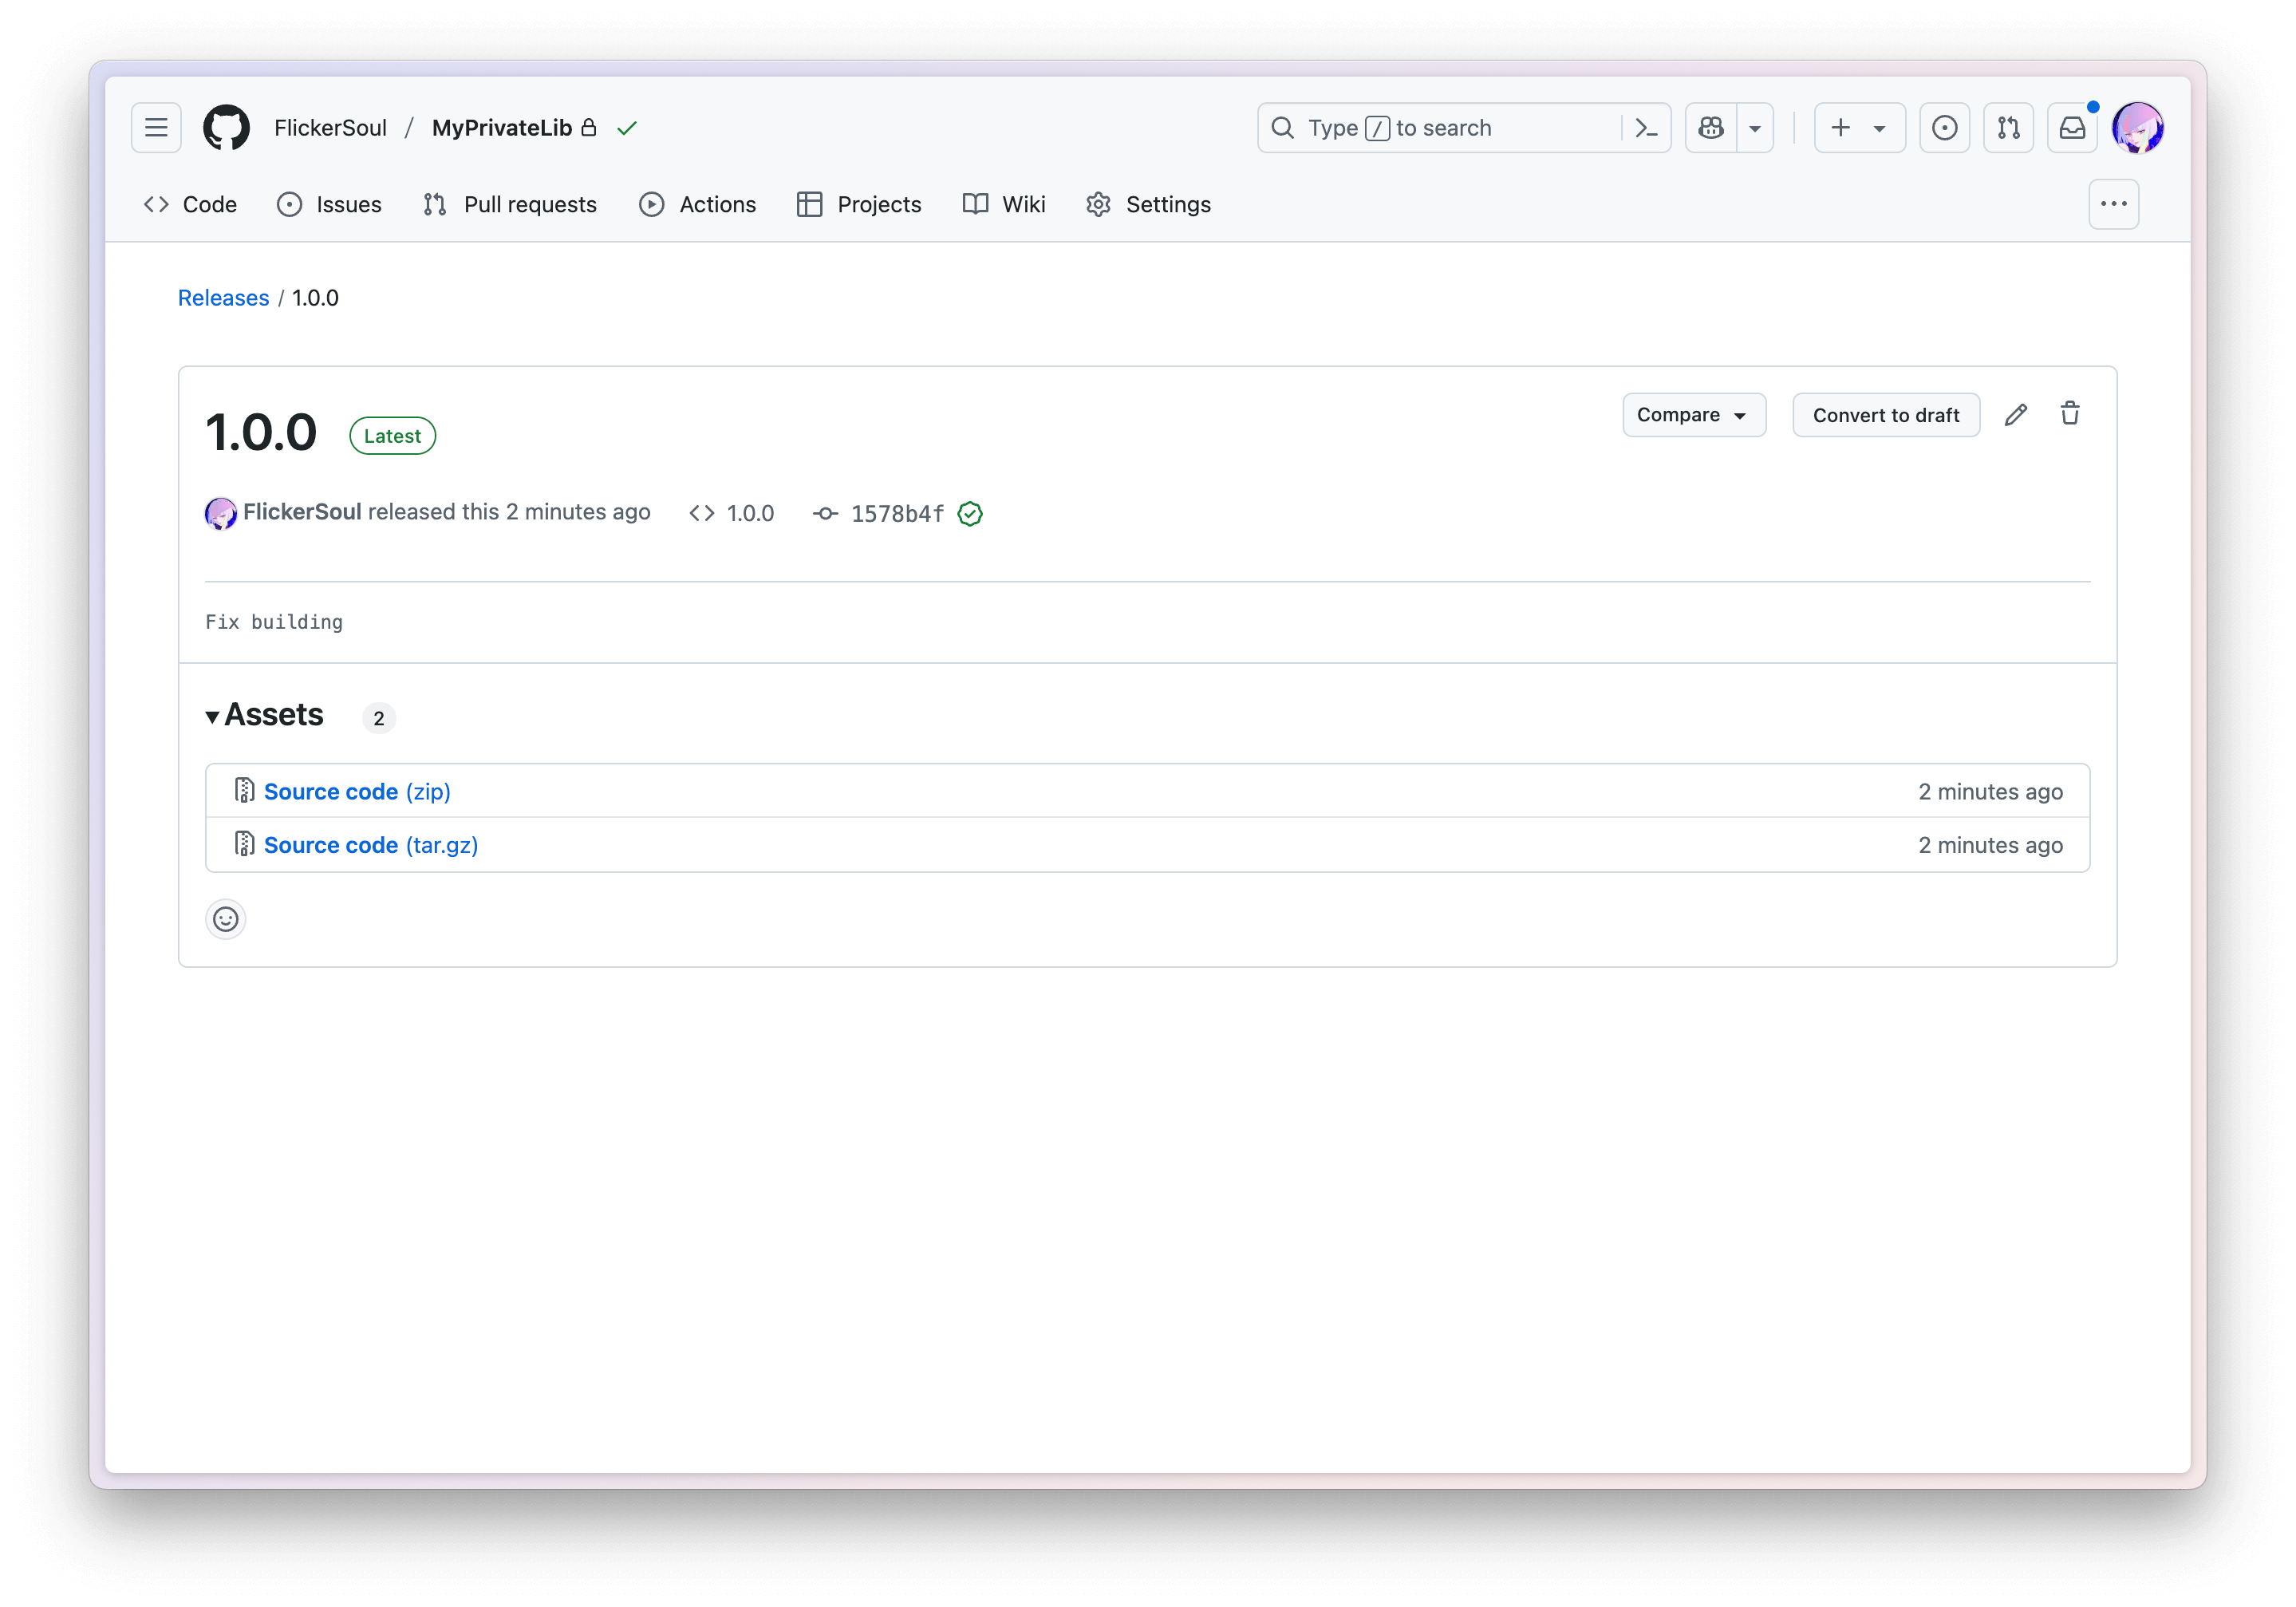
we can observe that a new commit and a new release will be created in the MyPrivateLibRelease repo, after the CI is run
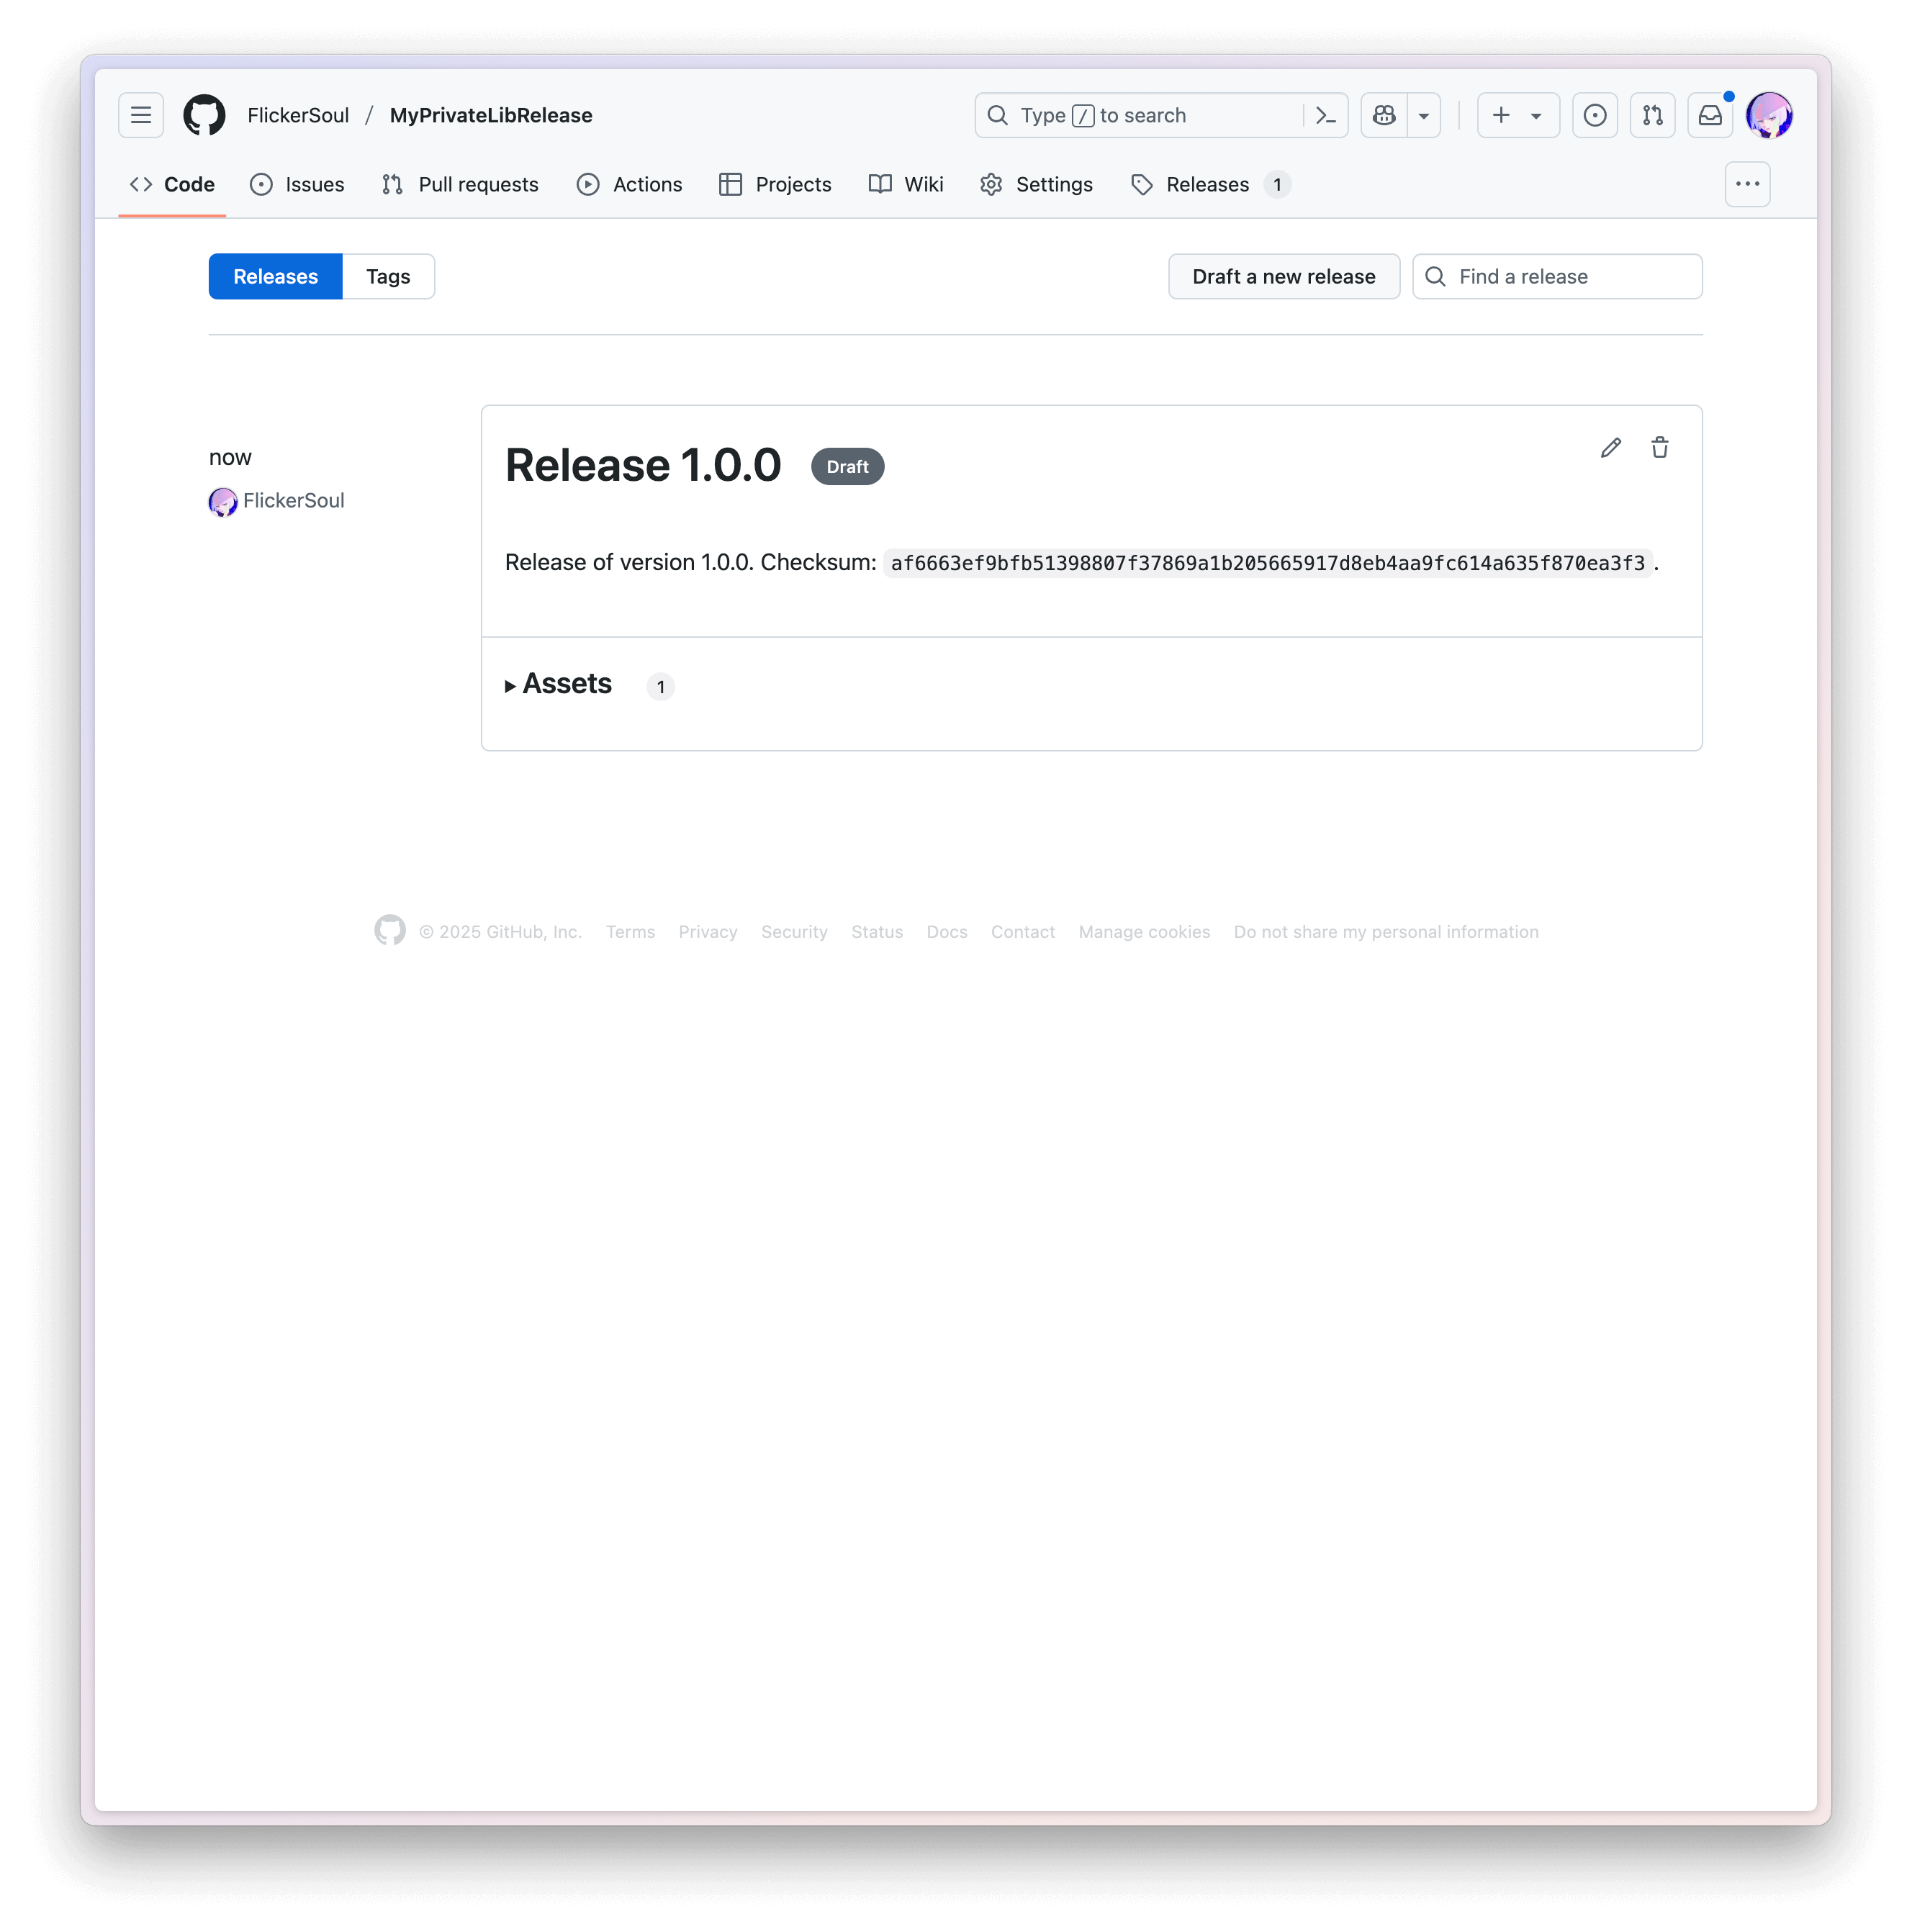
You can notice that release MyPrivateLibRelease is a draft release. This is done on purpose to prevent accidental release or unchecked mistakes. You manually edit the release to publish it, or add gh release edit <release_name> --draft=false to publish it automatically. Once the release is published, the user of this package can see this new version and use it.
Use The Binary Swift Package
After adding the binary swift package MyPrivateLibRelease to the package manager, you can import and use MyPrivateLib like how normally you would do. For instance,
import MyPrivateLib // Note that it's not `import MyPrivateLibRelease`.
import SwiftUI

ContentView: View {
    @State var output = ""
    var body: some View {
        List {
            Text(output)
            Button("Update Output") {
                output = "\(myPublicFunction())"
            }
        }
    }
}
Bonus: Private Release Repository
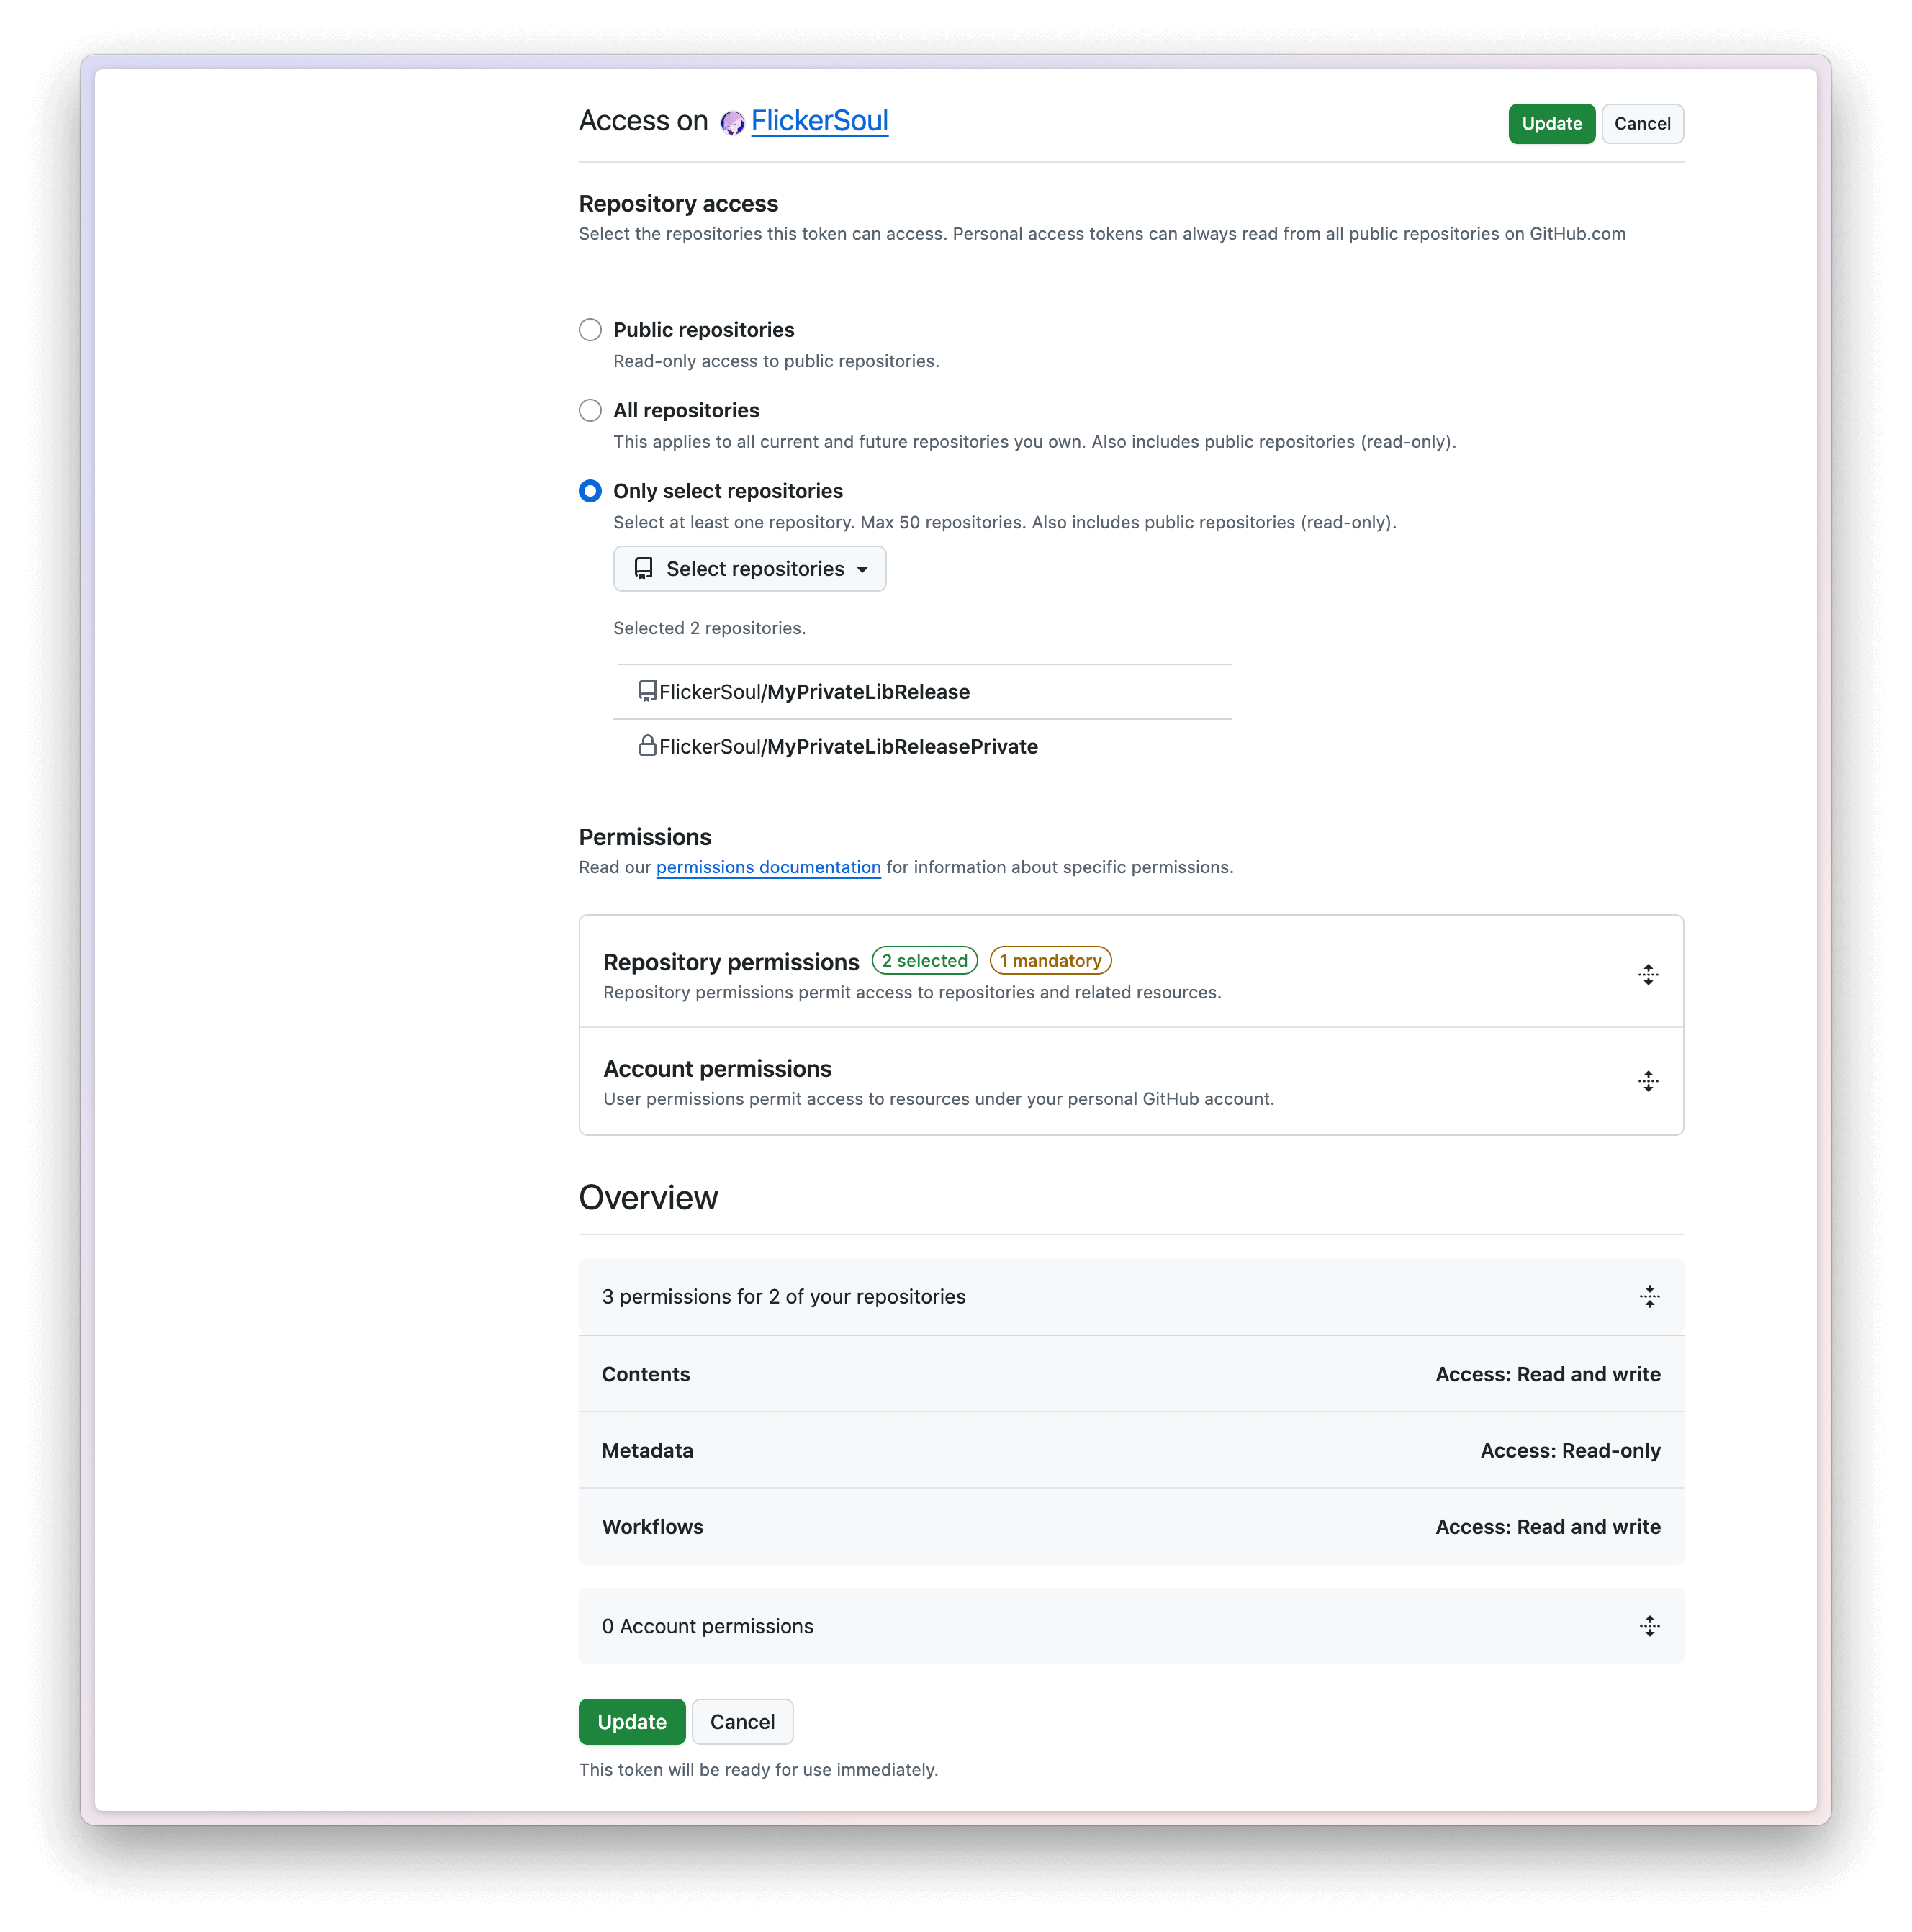
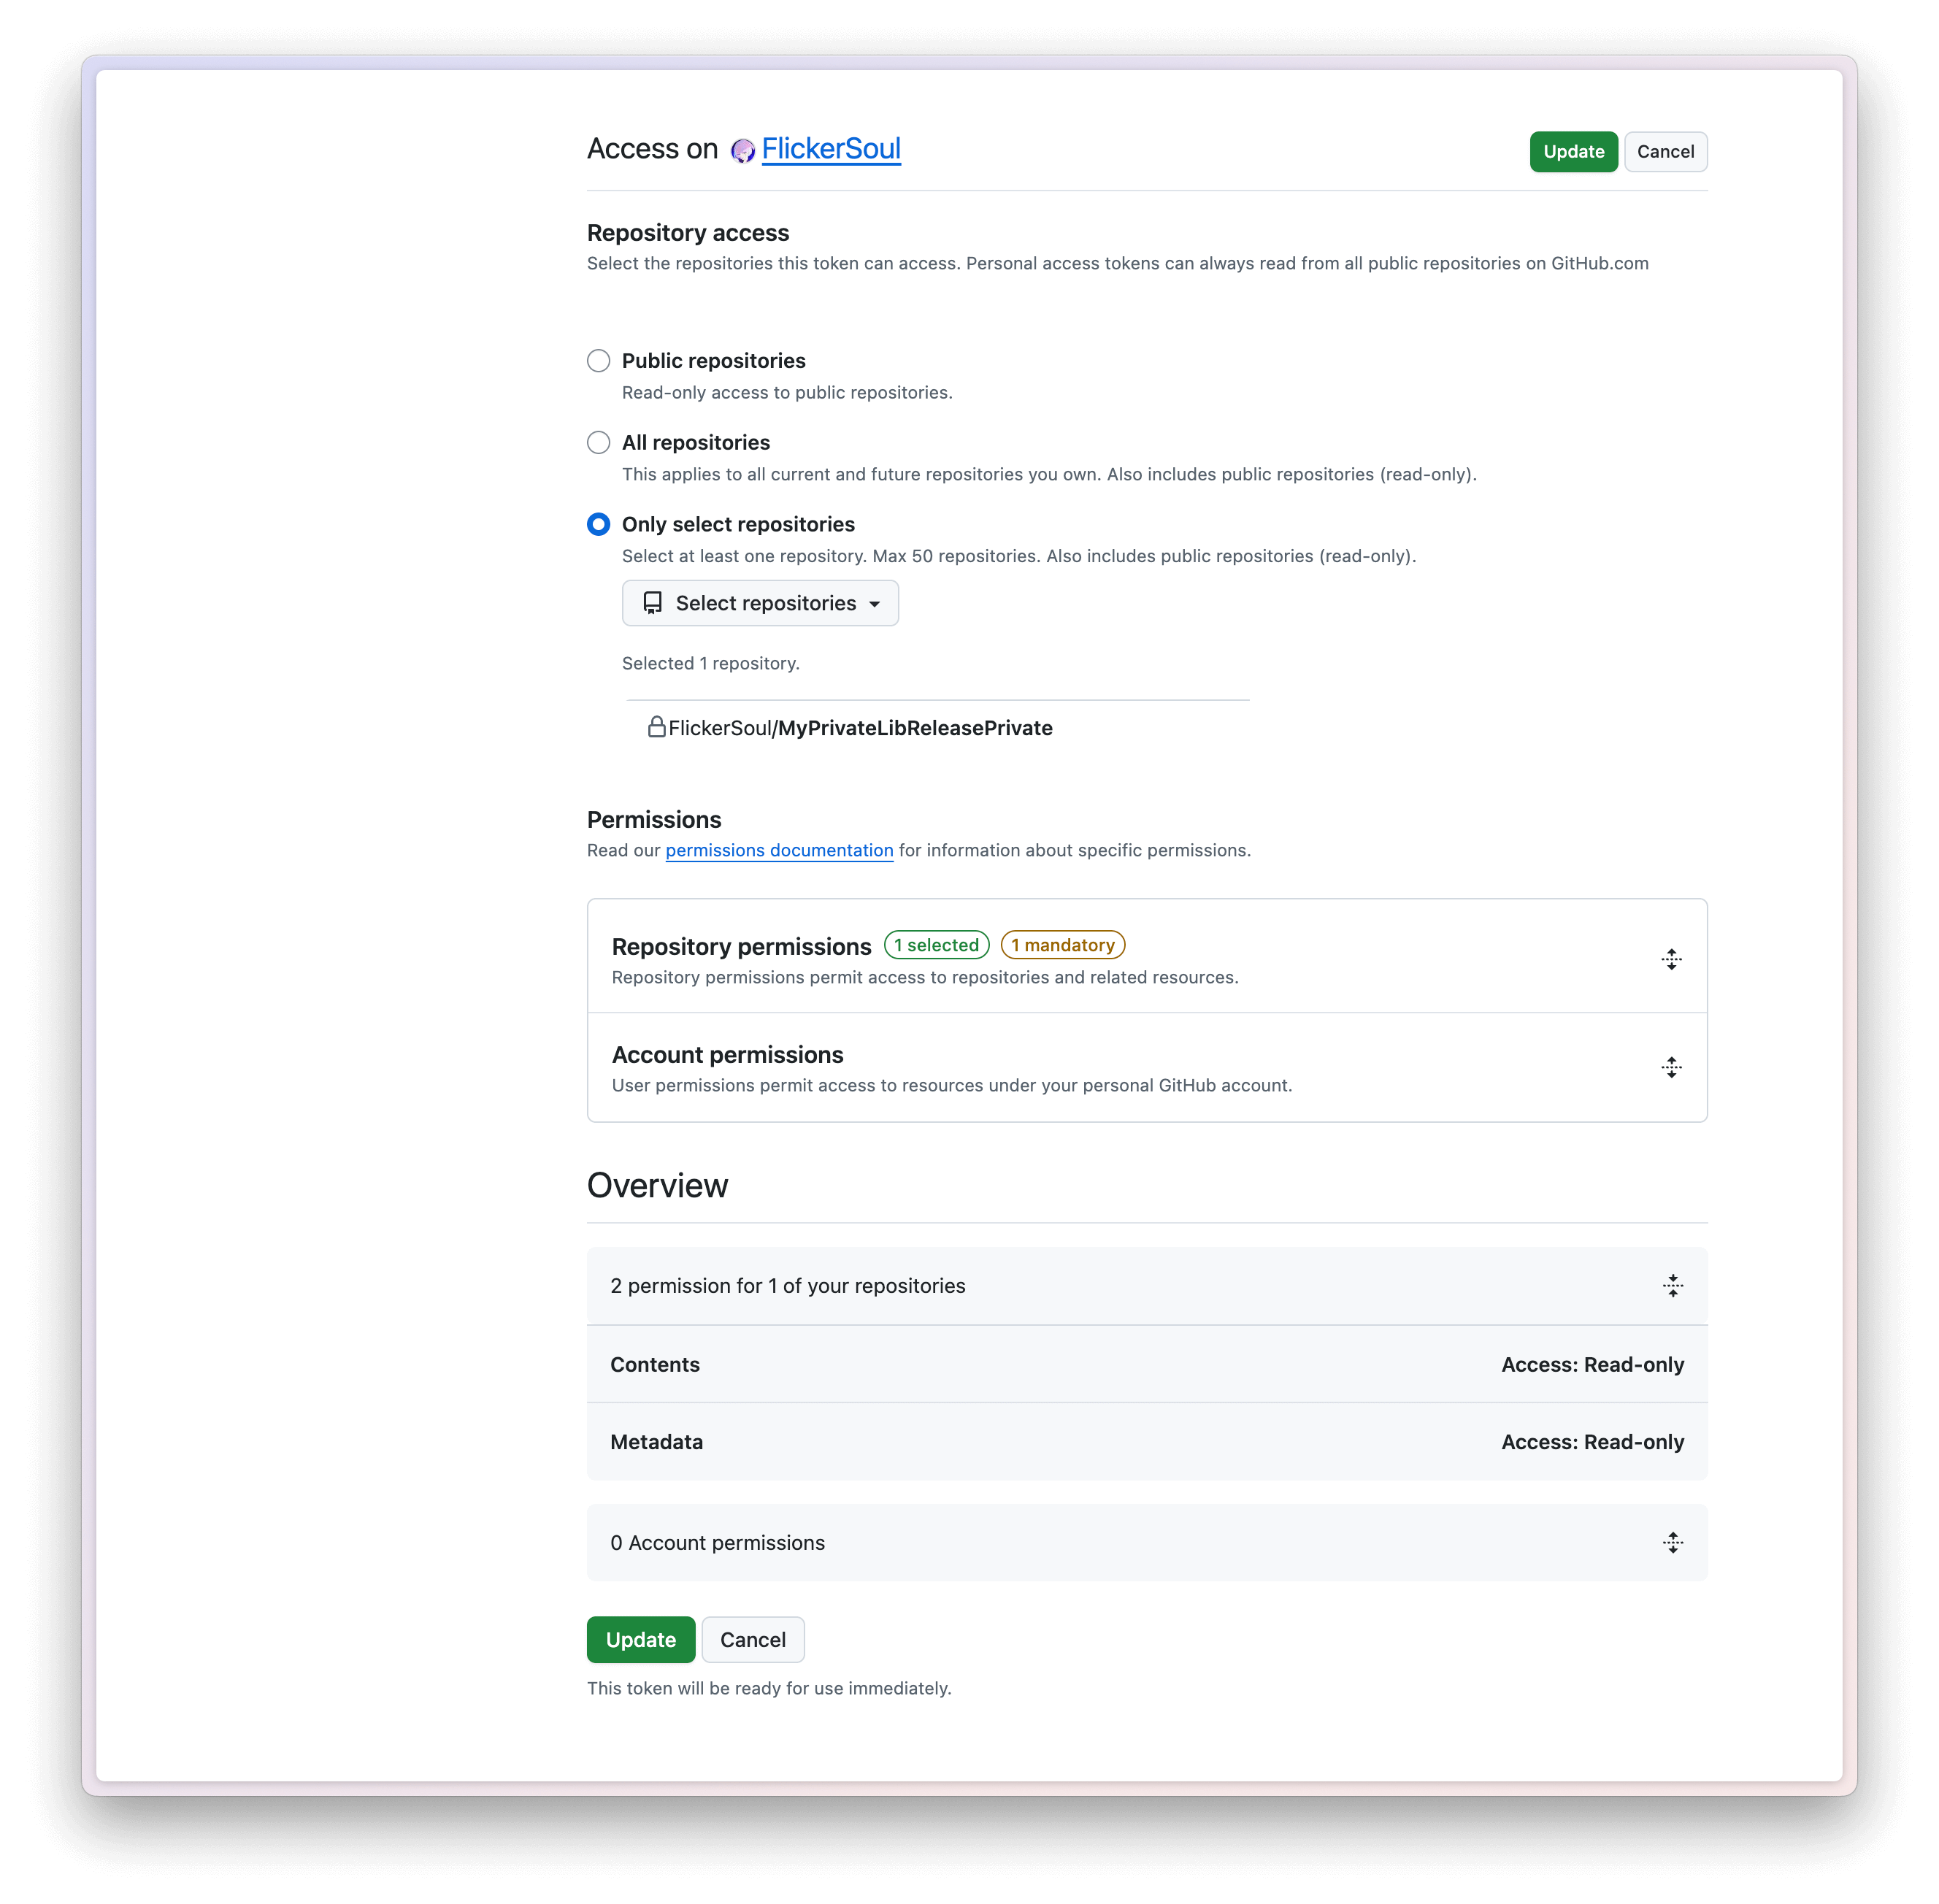
In my use case, the binary Swift package is private, and only the selected clients have access to it. I created MyPrivateLibReleasePrivate as an illustration, which is published using a copy of the same workflow above. For clients to access such private release repository, a read PAT is needed, with a read-only Content permission.
To let XCode know how to authenticate itself to access the binary in the GitHub Release of the private repository, the client needs to create a .netrc under their home directory (that is, ~/.netrc), with the following content, where <username> is the username from which the PAT is generated.
machine api.github.com
  login <username>
  password <PAT>
For more information about why .netrc is needed, see this post.
To access the MyPrivateLibReleasePrivate repo, you can try with the following the token 11ADF5YFA0Eaqlx54U0TJ3_b91EiJVRLmR0IunzI10l7Tp9ktzBJR1CxSQ8hRJ11GPX4LG7ZSM2pFKyRWX by prefixing github_pat_ to it.
machine api.github.com
  login FlickerSoul
  password <PAT>